⏲️ Estimated reading time: 6 min
How To Make Best Settings Nvidia Control Panel RTX 5050
Unlock the full potential of your NVIDIA GeForce RTX 5050 with the best Nvidia Control Panel settings. This in-depth guide explains how to optimize performance, visuals, and latency, whether you’re gaming, streaming, or creating content on your PC.
NVIDIA GeForce RTX 5050
The launch of the NVIDIA GeForce RTX 5050 marks a new era in graphics technology, offering improved ray tracing, AI-driven DLSS 4.0, and higher efficiency. However, to maximize the true performance of this GPU, the out-of-the-box settings in Windows and the NVIDIA Control Panel are often not enough.
By fine-tuning your Control Panel settings, you can squeeze out every bit of power from your RTX 5050. Whether you’re gaming at 1080p, 1440p, or 4K, the right settings can balance performance and quality, reduce stuttering, lower input lag, and enhance visual clarity.
This guide will walk you step by step through the best NVIDIA Control Panel settings for the RTX 5050, along with bonus tips for GeForce Experience users.
Why Optimize Nvidia Control Panel Settings?
The NVIDIA Control Panel is an underrated yet powerful tool that directly controls how your graphics card interacts with your system and games. With the RTX 5050’s advanced hardware, default settings can sometimes be too conservative. Optimizing them ensures:
- Higher FPS (frames per second) – smoother gameplay.
- Lower latency – faster input response in competitive games.
- Sharper visuals – cleaner textures and reduced aliasing.
- Efficient power usage – maximizing GPU life and reducing unnecessary heat.
Step 1 – Update Your GPU Drivers
Before adjusting settings, ensure your drivers are up-to-date:
- Download the latest Game Ready Driver from the NVIDIA official site.
- Use Clean Install during setup to avoid conflicts with old profiles.
- Reboot your system before continuing.
Step 2 – Accessing NVIDIA Control Panel
- Right-click on your desktop.
- Select NVIDIA Control Panel.
- If you don’t see it, reinstall drivers or use GeForce Experience to restore it.
Step 3 – Adjust Image Settings with Preview
- Go to Adjust image settings with preview.
- Select Use the advanced 3D image settings.
- Click Take me there to jump to 3D settings.
This ensures full control instead of leaving decisions to automatic optimizations.
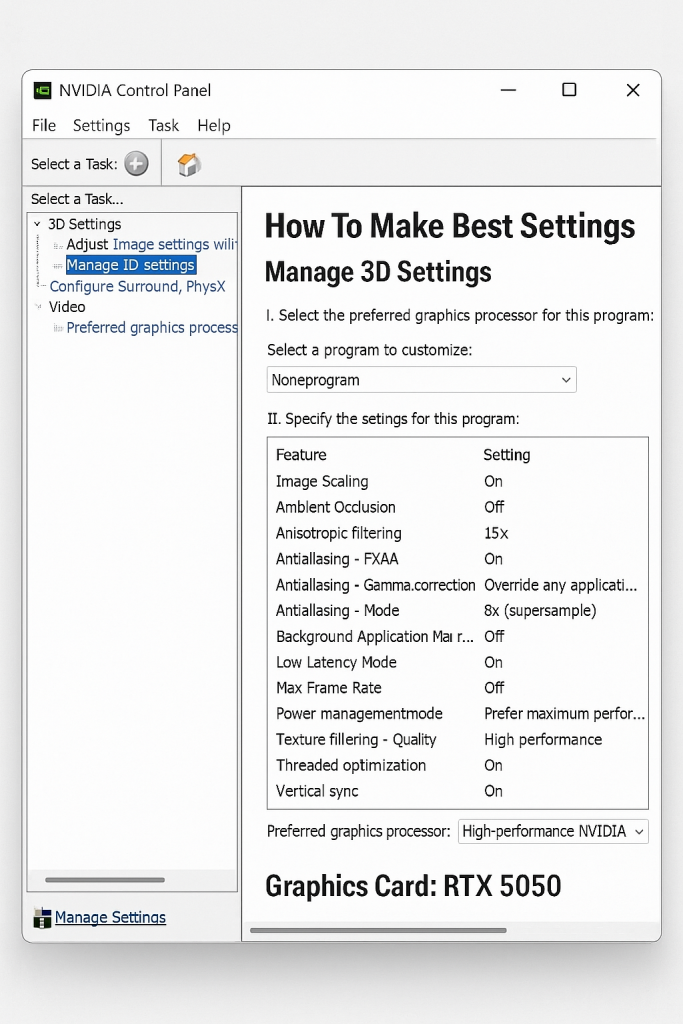
Step 4 – Global 3D Settings for RTX 5050
Navigate to Manage 3D Settings → Global Settings. Apply these for best performance:
- 1. Image Scaling: Off (use DLSS in games instead).
- 2. Ambient Occlusion: Performance (better FPS balance).
- 3. Anisotropic Filtering: 16x (crisp textures, minimal FPS cost).
- 4. Antialiasing – FXAA: Off (use TAA/DLSS instead).
- 5. Antialiasing – Mode: Application-controlled.
- 6. Background Application Max Frame Rate: 30 (saves resources).
- 7. CUDA – GPUs: All.
- 8. DSR Factors: Off (enable only for 4K downscaling).
- 9. Low Latency Mode: Ultra (ideal for esports).
- 10. Max Frame Rate: Off (unless screen tearing occurs).
- 11. Multi-Frame Sampled AA (MFAA): Off (rarely useful with RTX tech).
- 12. OpenGL Rendering GPU: Select RTX 5050.
- 13. Power Management Mode: Prefer maximum performance.
- 14. Preferred Refresh Rate: Highest available.
- 15. Shader Cache Size: Unlimited (RTX 5050 has fast VRAM).
- 16. Texture Filtering – Quality: High performance.
- 17. Threaded Optimization: On.
- 18. Triple Buffering: Off (unless using V-Sync).
- 19. Vertical Sync: Off (use G-Sync if supported).
- 20. Virtual Reality pre-rendered frames: 1 (reduces latency).
Step 5 – Configure Display Settings
Go to Display → Change Resolution:
- Resolution: Use your monitor’s native (1080p, 1440p, or 4K).
- Refresh Rate: Highest available (120Hz, 144Hz, 240Hz).
- Color Depth: 32-bit.
- Output Color Format: RGB.
- Output Dynamic Range: Full (0–255).
Step 6 – Enable G-Sync (if available)
If your monitor supports G-Sync:
- Go to Set up G-Sync.
- Check Enable G-Sync, G-Sync Compatible.
- Apply for fullscreen mode (or windowed+fullscreen if needed).
Step 7 – Configure Surround, PhysX
- Set PhysX processor to RTX 5050 instead of auto.
- This avoids CPU bottlenecks.
Step 8 – Best Game-Specific Optimizations
While Global Settings apply system-wide, use Program Settings to tweak for individual games:
- Competitive shooters (CS2, Valorant, Apex Legends) → Low Latency Mode Ultra, Texture Filtering High Performance.
- Story-driven AAA (Cyberpunk 2077, Starfield) → Use High Quality textures, DLSS Quality mode, Ray Tracing enabled selectively.
- Older games → Enable DSR for 4K downscaling on 1080p displays.
Step 9 – GeForce Experience Bonus Settings
The RTX 5050 pairs perfectly with GeForce Experience for added performance:
- NVIDIA Reflex: On + Boost (in supported games).
- DLSS 4.0: Use Quality mode for balance, Performance mode for 4K.
- Automatic Game Optimization: Optional, but can serve as a starting point.
- ShadowPlay: Enable Instant Replay for highlights without big FPS drops.
Step 10 – Windows Optimizations for RTX 5050
- Windows Power Plan: Set to High Performance.
- Game Mode: On.
- Hardware-accelerated GPU Scheduling: On (Windows 10/11).
- Background apps: Disable unnecessary processes.
Advanced Tips for Enthusiasts
- Overclocking: Use MSI Afterburner for safe +100 MHz core and +500 MHz VRAM.
- Fan Curve: Optimize cooling for quieter operation.
- Reshade Filters: Sharpen visuals for games without built-in sharpening.
- DLDSR: Use for older titles that benefit from higher resolution downsampling.
Troubleshooting Common Issues
- Screen tearing → Enable G-Sync or V-Sync in-game.
- Lag spikes → Lower Texture Filtering or disable Background Apps FPS cap.
- Driver crashes → Use Clean Install, monitor temps, or roll back unstable drivers.
Recommended Settings by Resolution
1080p (Competitive Gaming)
- DLSS: Off or Performance
- Latency: Ultra
- Textures: High Performance
1440p (Balanced)
- DLSS: Quality
- Ray Tracing: Medium
- Textures: High
4K (Cinematic)
- DLSS: Performance or Ultra Performance
- Ray Tracing: On (where possible)
- Ambient Occlusion: High Quality
Optimized Setup Example for Cyberpunk 2077 with RTX 5050
- DLSS 4.0: Quality
- Ray Tracing: Medium-High
- Reflex: On + Boost
- V-Sync: Off (use G-Sync)
- Textures: High
Expect ~120 FPS at 1440p Ultra settings with these tweaks.
Final Thoughts
The NVIDIA GeForce RTX 5050 is a powerful GPU, but its performance depends heavily on fine-tuning. By properly configuring the NVIDIA Control Panel and GeForce Experience, you can achieve buttery smooth gameplay, crystal-clear visuals, and faster response times.
Even if you’re not an advanced user, following these steps ensures you’re not leaving performance on the table.
Conclusion
Optimizing your NVIDIA Control Panel settings for the RTX 5050 can transform your gaming experience. From global 3D settings to per-game profiles, every tweak contributes to smoother frames, sharper visuals, and lower latency. With the right balance, your RTX 5050 becomes a future-ready graphics powerhouse.
🔔 For more tutorials like this, consider subscribing to our blog.
📩 Do you have questions or suggestions? Leave a comment or contact us!
🏷️ Tags: Nvidia RTX 5050, Nvidia Control Panel, GPU Optimization, Gaming Performance, RTX 5000 Series, Nvidia Settings Guide, GeForce Experience, DLSS 4.0, G-Sync Setup, PC Gaming
📢 Hashtags: #Nvidia #RTX5050 #PCGaming #NvidiaSettings #GamingPerformance #DLSS #GSync #RTX5000 #GeForce #Optimization
Only logged-in users can submit reports.
Discover more from HelpZone
Subscribe to get the latest posts sent to your email.