

⏲️ Estimated reading time: 6 min
Table of Contents
Windows 10 Repair Upgrade – Fix Windows Without Losing Files
A Windows 10 repair upgrade helps fix system problems like slowdowns, errors, or corrupted files without deleting your data or apps. This in-place reinstall gives your system a fresh start while keeping everything intact.
🛠️ What Is a Windows 10 Repair Upgrade?
Learn how to repair and upgrade Windows without losing files. This step-by-step guide covers safe methods, including in-place upgrades, repair installations, and essential precautions, ensuring your personal data and apps remain intact during the process.
Windows is a powerful operating system, but like any software, it can experience problems slow performance, corrupted files, update errors, or even system crashes. Many users panic when issues arise, fearing they will lose their files during a repair or upgrade. The good news is that Windows repair upgrade (also known as an in-place upgrade) lets you fix Windows problems while keeping your files and installed programs safe.
In this comprehensive guide, we’ll cover how to repair Windows through upgrade methods without losing files. You’ll also learn when to use these techniques, what tools you need, and how to troubleshoot if something goes wrong.
Why Choose Repair Upgrade Instead of a Clean Install?
A clean install wipes everything files, apps, and settings giving you a fresh start. While this often solves deep system problems, it’s not always practical because:
- You must back up everything manually.
- Applications and drivers need to be reinstalled.
- Settings and personal customizations are lost.
On the other hand, a repair upgrade:
- Keeps personal files (documents, pictures, videos, downloads).
- Retains installed applications.
- Preserves most settings.
- Fixes corrupted system files.
- Updates Windows to the latest version.
This makes it the perfect option for users who want stability and performance without the hassle of starting over.
Situations Where Repair Upgrade Helps
You may want to perform a repair upgrade when experiencing:
- Corrupted system files – frequent crashes, missing DLLs, or BSOD errors.
- Update failures – Windows Update not working or stuck.
- Sluggish performance despite regular cleanup.
- Damaged Windows installation after malware or improper shutdowns.
- Boot issues where Windows still starts but behaves abnormally.
If Windows does not boot at all, this method might not work you’ll need recovery tools or a clean installation.
What You Need Before Starting
Before repairing your Windows through upgrade:
- A Stable Internet Connection – to download the latest ISO or use the Media Creation Tool.
- Windows ISO / Installation Media – official Microsoft files.
- At Least 20–25 GB Free Disk Space – required for installation.
- Laptop/PC Power Supply – don’t risk power loss during setup.
- Backup – although repair upgrade keeps files, always back up important data just in case.
Method 1: Repair Upgrade with Media Creation Tool (Recommended)
This is the easiest and safest method.
You may also be interested in: Steve Jobs – 71 Years Since the Birth of a Visionary
1 – Download Media Creation Tool
- Go to the official Microsoft Download page.
- Select your Windows version (10 or 11).
- Download the Media Creation Tool.
2 – Run the Tool
- Launch the downloaded
.exe. - Accept the license terms.
3 – Choose Upgrade Option
- Select Upgrade this PC now.
- The tool will download the latest Windows files.
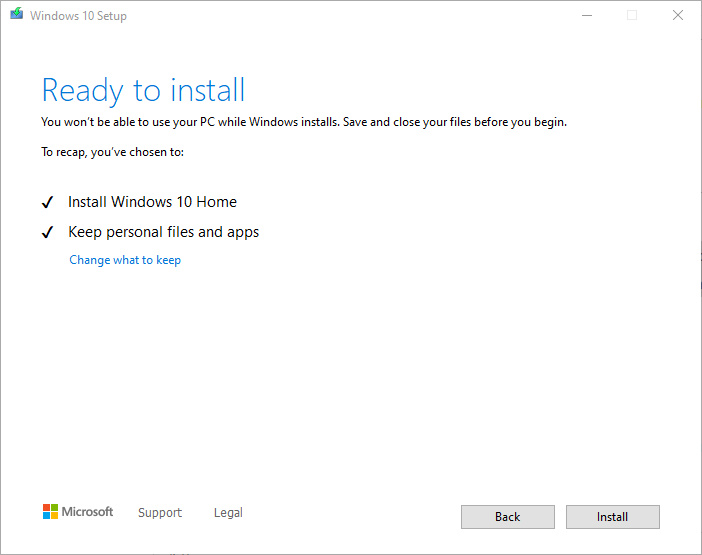
4 – Keep Files and Apps
- During setup, select Keep personal files and apps.
- Confirm the settings.
5 – Install
- The installation will begin.
- Your PC will restart multiple times.
- After completion, you’ll have a refreshed Windows without losing files.
Method 2: Repair Upgrade Using ISO File
This method is useful if you already have the ISO downloaded.
1 – Mount ISO
- Right-click the ISO → Mount.
- A virtual drive appears.
2 – Run Setup
- Open the new drive → run
setup.exe.
3 – Select Upgrade
- Choose Upgrade this PC.
- Follow the on-screen steps.
4 – Keep Files and Apps
- When asked, select Keep personal files and apps.
5 – Finish Installation
- Let Windows update and repair.
Method 3: Repair Installation with Windows USB/DVD
If your system is unstable, use a bootable USB.
1 – Create Bootable Media
- Use the Media Creation Tool or Rufus to create a bootable USB.
2 – Insert and Run Setup
- Plug it into your PC while logged into Windows.
- Run
setup.exefrom the USB.
3 – Follow Upgrade Steps
- Select Upgrade instead of Custom.
- Choose Keep personal files and apps.
Advanced Option: System File Checker (SFC) and DISM Before Repair
Before a full upgrade, try these built-in tools.
- Open Command Prompt (Admin).
- Run:
sfc /scannow - Then run:
DISM /Online /Cleanup-Image /RestoreHealth
If these commands don’t fix issues, proceed with repair upgrade.
What Happens to Your Files and Programs?
- Documents, Pictures, Downloads → Safe.
- Applications → Stay installed.
- Drivers → Usually preserved.
- Settings → Most remain but some may reset.
- Windows Updates → Installed to the latest version.
Troubleshooting Repair Upgrade Issues
Sometimes the process fails. Here’s what to do:
- Not Enough Space – Free up storage using Disk Cleanup.
- Corrupt ISO – Re-download from Microsoft.
- Third-Party Antivirus – Disable before upgrade.
- Stuck at 0% or 99% – Restart the process, check internet.
- Error Codes – Look up the code on Microsoft’s website.
Tips to Ensure Smooth Repair Upgrade
- Disconnect unnecessary external devices (printers, cameras, etc.).
- Update BIOS and drivers if possible.
- Keep your system plugged into power.
- Write down any error codes if they appear.
- Be patient the process can take 30 minutes to 2 hours.
Advantages of Repair Upgrade
- Fixes most system errors without full reinstall.
- Saves time compared to clean install.
- Retains all files and apps.
- Updates to latest Windows build.
Limitations of Repair Upgrade
- Cannot fix hardware-related issues.
- May fail if system is severely corrupted.
- Requires stable Windows boot.
- Some settings may reset to default.
Alternative: Reset This PC (With File Preservation)
If repair upgrade doesn’t work, try Reset this PC:
- Go to Settings → Update & Security → Recovery.
- Select Reset this PC.
- Choose Keep my files.
- Windows reinstalls while preserving your documents (but apps are removed).
Safe Practices After Repair Upgrade
- Run Windows Update to apply patches.
- Check Device Manager for driver updates.
- Create a fresh restore point.
- Perform a system backup using tools like Macrium Reflect.
Final Section – Key Takeaways
A repair upgrade is the best way to fix Windows without losing your files or applications. Unlike a clean install, it saves time and prevents data loss. Whether you use the Media Creation Tool, ISO file, or bootable USB, the process ensures your system is repaired and updated.
🔔For more tutorials like this, consider subscribing to our blog.
📩 Do you have questions or suggestions? Leave a comment or contact us!
🏷️ Tags: Windows repair upgrade, fix Windows without losing files, in-place upgrade, Windows 10 repair, Windows 11 repair, Media Creation Tool, Windows ISO, repair installation, troubleshoot Windows, system fix
📢 Hashtags: #WindowsRepair #WindowsUpgrade #FixWithoutLosingFiles #Windows10 #Windows11 #MicrosoftSupport #TechGuide #SystemRepair #InPlaceUpgrade #WindowsTips
