

⏲️ Estimated reading time: 6 min
Table of Contents
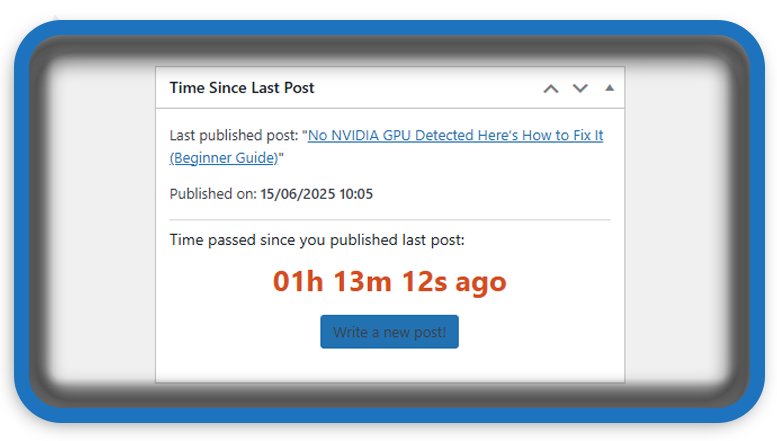
Keep your blog active! This simple plugin helps you track how much time has passed since your last post was published. Perfect for bloggers who want a gentle nudge to stay consistent.
Creating a custom WordPress plugin might seem overwhelming for beginners, but don’t worry. This guide will walk you through building a simple and useful dashboard widget from scratch: a live timer that shows how much time has passed since your last published post.
⏱ Add a “Time Since Last Post” Widget to WordPress Dashboard
Let’s break it down into steps and explain everything in plain language.
🧩 What This Plugin Does
This custom plugin will:
- Display the title and publish time of your most recent post.
- Show a dynamic counter (like a stopwatch) that updates every second.
- Encourage you to write new content if too much time has passed.
It’s great for staying productive and knowing when your blog needs fresh content.
🛠️ Full Plugin Code
Below is the complete code for the plugin. You’ll learn how it works in the next sections.
<?php
/**
 * Plugin Name: Time Since Last Post Dashboard Widget
 * Description: Displays how much time has passed since the last blog post was published.
 * Version: 1.0
 * Author: HelpZone
 */

add_action('wp_dashboard_setup', 'hz_elapsed_time_dashboard_widget');

function hz_elapsed_time_dashboard_widget() {
    wp_add_dashboard_widget(
        'hz_elapsed_time_dashboard_widget',
        'Time Since Last Post',
        'hz_elapsed_time_dashboard_widget_content'
    );
}

function hz_elapsed_time_dashboard_widget_content() {
    $last_post = get_posts([
        'numberposts' => 1,
        'post_type'   => 'post',
        'post_status' => 'publish',
        'orderby'     => 'post_date',
        'order'       => 'DESC',
    ]);

    $last_post_time = 0;
    $post_title = 'No posts yet.';
    $post_link = '';

    if (!empty($last_post)) {
        $last_post_obj = $last_post[0];
        $last_post_time = strtotime($last_post_obj->post_date_gmt . ' +0000');
        $post_title = esc_html($last_post_obj->post_title);
        $post_link = get_permalink($last_post_obj->ID);
    }

    $current_gmt_time = current_time('timestamp', true);
    ?>
    <div class="elapsed-time-widget">
        <?php if (!empty($last_post)) : ?>
            <p>Last published post: "<a href="<?php echo $post_link; ?>"><?php echo $post_title; ?></a>"</p>
            <p>Published on: <strong><?php echo date_i18n(get_option('date_format') . ' ' . get_option('time_format'), $last_post_time); ?></strong></p>
            <hr/>
            <h3>Time passed since you published last post:</h3>
            <div id="elapsed-timer" style="font-size: 2em; font-weight: bold; text-align: center; color: #d54e21;">
                <span class="elapsed-display">Calculating...</span>
            </div>
            <p style="text-align: center;">
                <a href="<?php echo admin_url('post-new.php'); ?>" class="button button-primary">Write a new post!</a>
            </p>
        <?php else : ?>
            <p>No posts have been published yet. Once you publish, the timer will start.</p>
            <p style="text-align: center;">
                <a href="<?php echo admin_url('post-new.php'); ?>" class="button button-primary">Publish your first post!</a>
            </p>
        <?php endif; ?>
    </div>

    <script type="text/javascript">
        jQuery(document).ready(function($) {
            var lastPostTime = <?php echo $last_post_time; ?> * 1000;
            var serverNow = <?php echo $current_gmt_time; ?> * 1000;
            var clientStartTime = new Date().getTime();

            function updateElapsedTime() {
                var clientNow = new Date().getTime();
                var estimatedServerNow = serverNow + (clientNow - clientStartTime);
                var elapsed = estimatedServerNow - lastPostTime;

                var days = Math.floor(elapsed / (1000 * 60 * 60 * 24));
                var hours = Math.floor((elapsed % (1000 * 60 * 60 * 24)) / (1000 * 60 * 60));
                var minutes = Math.floor((elapsed % (1000 * 60 * 60)) / (1000 * 60));
                var seconds = Math.floor((elapsed % (1000 * 60)) / 1000);

                var text = '';
                if (days > 0) {
                    text += String(days).padStart(2, '0') + 'd ';
                }
                text += String(hours).padStart(2, '0') + 'h ';
                text += String(minutes).padStart(2, '0') + 'm ';
                text += String(seconds).padStart(2, '0') + 's ago';

                var display = $('#elapsed-timer .elapsed-display');
                display.text(text);

                if (elapsed >= 24 * 60 * 60 * 1000) {
                    display.css('color', 'green');
                }
            }

            updateElapsedTime();
            setInterval(updateElapsedTime, 1000);
        });
    </script>
    <?php
}
?>
🧰 Step-by-Step: How to Use This Plugin
1. Open Your WordPress Plugin Folder
Use FTP, File Manager in cPanel, or local dev tools and go to:
wp-content/plugins/
2. Create a New Plugin File
Create a file called:
time-since-last-post.php
Paste the full code from above into this file and save.
3. Activate the Plugin
- Go to your WordPress dashboard
- Navigate to Plugins → Installed Plugins
- Find Time Since Last Post Dashboard Widget
- Click Activate
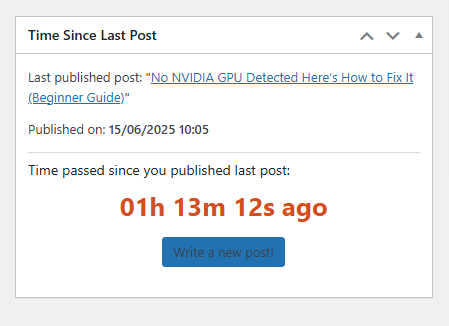
Done! A new box will now appear in your Dashboard.
🧠 How It Works: Explained for Beginners
add_action('wp_dashboard_setup', ...)
This hook tells WordPress to run a function when setting up the admin dashboard. Our function hz_elapsed_time_dashboard_widget() adds the custom box.
get_posts([...])
This retrieves the most recent published blog post. If you haven’t posted anything yet, it defaults to a message.
JavaScript Timer
The live counter uses jQuery to update the time every second. It also calculates the time based on GMT so it stays accurate, even if your browser time is off.

✅ Bonus Features
- Automatically turns the timer green when more than 24 hours have passed.
- Includes a “Write a new post” button right inside the widget.
- Fully dynamic – no page refresh needed.
🧪 Test It!
You can test the widget by:
- Creating and publishing a post.
- Visiting your WordPress Dashboard.
- Watching the timer increase in real time.
- Waiting more than 24 hours to see the color change.
🔄 Customize It
You can easily change:
- Colors
- Date format
- Default messages
- The position or size of the widget
This is just a starting point – get creative!
📦 Plugin Folder Structure
wp-content/
└── plugins/
    └── time-since-last-post/
        └── time-since-last-post.php
Make sure the file and folder names match!
🚀 Who Is This For?
- Bloggers who want reminders to post more consistently
- WordPress beginners exploring dashboard customizations
- Agencies managing multiple content sites
- Developers learning to combine PHP + JavaScript in WordPress
🔔For more tutorials like this, consider subscribing to our blog.
📩 Do you have questions or suggestions? Leave a comment or contact us!
🏷️ Tags: WordPress plugins, beginner WordPress, dashboard widget, PHP plugin tutorial, elapsed time, publish tracker, WordPress development, WP tutorial, blog productivity, WP dashboard
📢 Hashtags: #WordPress, #WPPlugin, #WPBeginner, #CustomPlugin, #WordPressDev, #DashboardWidget, #TimeTracker, #BlogTools, #CodingForBeginners, #HelpZoneTips
Final Thoughts
Adding custom features to your WordPress dashboard doesn’t have to be intimidating. With a simple plugin like this, you can track your publishing frequency and stay consistent without third-party tools. Keep building useful tools like this and you’ll quickly grow more confident with WordPress plugin development.
You may also be interested in: Who Would Look for You If You Disappeared for a Week?
