

⏲️ Estimated reading time: 32 min
Table of Contents
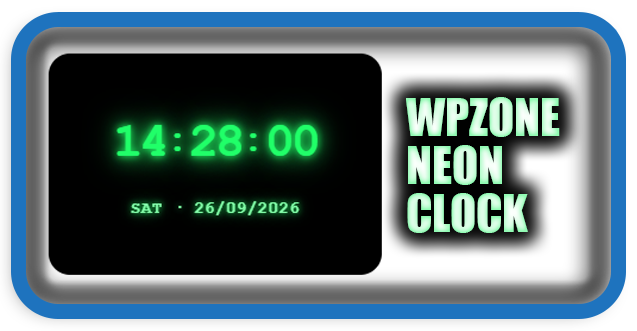
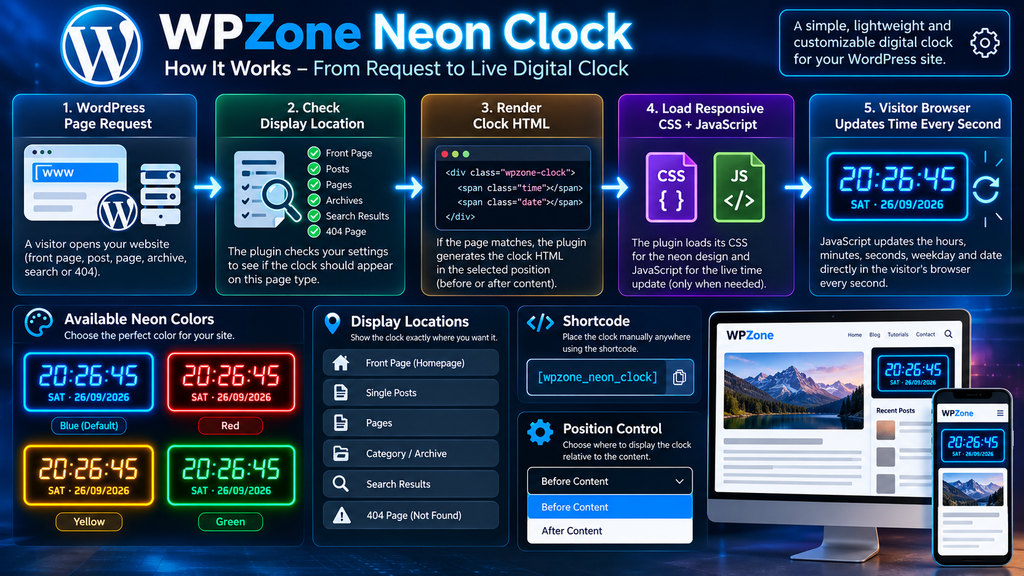
WPZone Neon Clock adds a responsive neon digital clock to WordPress with live hours, minutes, seconds, weekday, and date. Version 1.0.0 includes four neon colors, automatic placement controls, shortcode support, responsive sidebar styling, and precise visibility settings for posts, pages, archives, search results, and 404 pages.
What Is WPZone Neon Clock?
A digital clock may seem like a small addition to a WordPress website, but the right implementation can become an attractive visual element without overwhelming the page. WPZone Neon Clock was created for exactly this purpose. It provides a clean digital clock with a modern neon appearance while keeping configuration simple inside the WordPress dashboard.
The plugin displays the current time using hours, minutes, and seconds. Beneath the main clock, visitors can also see the abbreviated weekday and full date. Everything updates automatically in the browser, so visitors do not need to refresh the page to see the time change. The result feels much closer to a real digital display than a static time widget.
WPZone Neon Clock also gives administrators control over where the clock appears. Instead of forcing the same clock onto every page, version 1.0.0 can distinguish between the front page, individual posts, regular pages, archives, search results, and the 404 page. This makes the plugin useful for websites where different sections have different layouts.
Another important feature is the [wpzone_clock] shortcode. It provides a practical way to place the clock inside compatible WordPress content areas or widgets while still respecting the display-location rules configured by the administrator.
The plugin is especially suitable for technology blogs, gaming websites, personal blogs, news-style websites, dashboards, dark-themed websites, and WordPress projects where a futuristic visual element fits the overall design.
Current plugin version covered in this guide: 1.0.0
Main Features at a Glance
WPZone Neon Clock focuses on a relatively small set of features rather than trying to become an oversized design plugin. That simplicity makes the settings easier to understand.
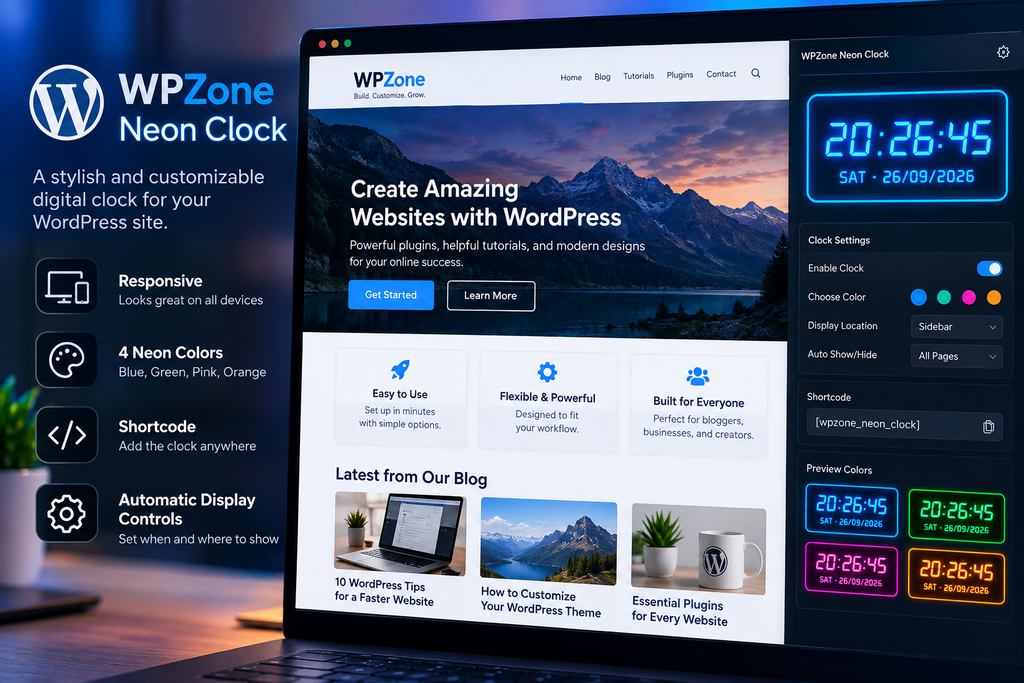
The plugin currently provides a live digital clock, seconds display, weekday and date information, four neon color choices, responsive styling, automatic placement, before-or-after content positioning, a shortcode, and independent location controls.
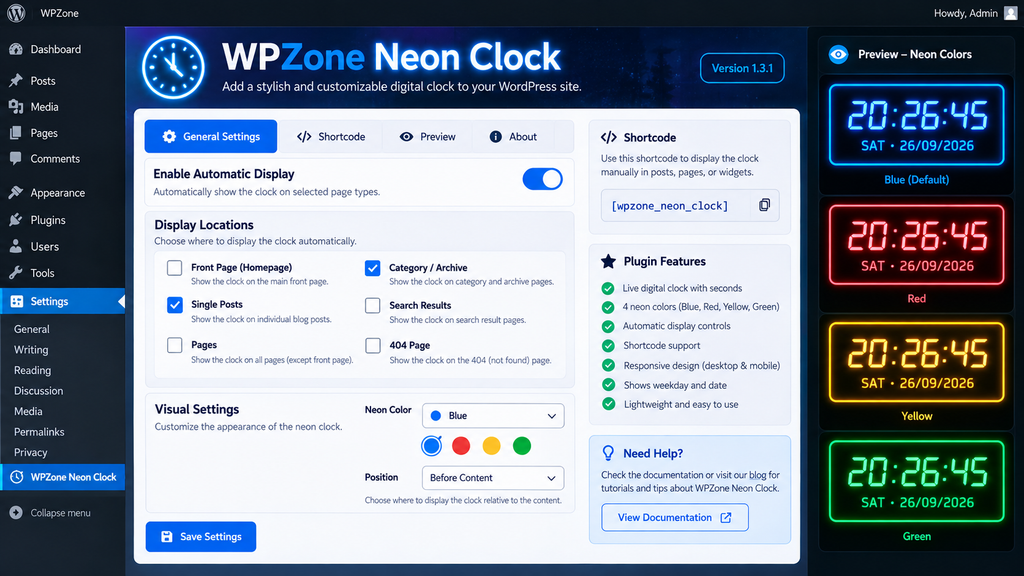
Available automatic display locations include the Front Page, Single Posts, Pages, Category / Archive, Search Results, and the 404 Page. Administrators can therefore build a much more controlled display configuration than they could with a basic shortcode-only clock.
The available neon colors are Blue, Red, Yellow, and Green. Blue works as the default appearance, while the other choices allow the clock to match different site designs.
Why Add a Digital Clock to WordPress?
Not every WordPress website needs a clock. However, certain website designs can benefit from one. Gaming websites, technology portals, streaming communities, dashboards, radio websites, personal projects, and sites with futuristic themes can use a digital clock as part of the visual identity.
The key is presentation. A plain clock can look outdated, especially when it resembles an old widget from the early days of the web. WPZone Neon Clock approaches the idea differently by using a large digital display, a dark background, and glowing neon styling. The appearance is closer to a modern desktop gadget or gaming interface.
A clock can also make a sidebar feel more dynamic. Many WordPress sidebars contain only static elements such as categories, archives, advertisements, recent posts, or search boxes. A continuously updating clock introduces movement without requiring video, animation libraries, or large media files.
However, decorative elements should always support the website rather than distract from its content. That is one reason the plugin includes location controls. You can display the clock only where it makes sense instead of forcing it across the entire site.
A Clock That Updates Without Reloading the Page
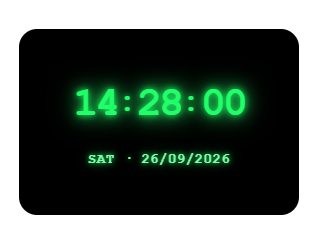
WPZone Neon Clock uses browser-side JavaScript to update the visible clock every second. The displayed values include hours, minutes, and seconds, followed by the weekday and date.
A typical display looks similar to:
20:26:45
SAT · 26/09/2026
The clock continues updating while the visitor remains on the page. There is no need to refresh WordPress every second or repeatedly request information from the server.
This approach is lightweight because WordPress generates the clock container while the visitor’s browser handles the ongoing time updates. The clock therefore does not need a new WordPress request every time one second passes.
The Visitor’s Local Device Time
An important detail is how the time is determined. WPZone Neon Clock uses the JavaScript Date object in the visitor’s browser. As a result, the displayed clock follows the local time configured on the visitor’s device rather than functioning as a fixed server-time or world-time-zone clock.
For many websites, this behavior is desirable. Someone visiting from Brussels can see their device’s local time, while another visitor elsewhere can see the time configured on their own computer or phone.
Website owners should understand this distinction before using the plugin for situations where a fixed official timezone is required. The current version is designed as a visitor-side digital clock, not as a synchronized time authority or appointment scheduling system.
Installing WPZone Neon Clock
Installing WPZone Neon Clock follows the familiar workflow used for manually uploaded WordPress plugins. Before installing any plugin, creating a recent backup is a sensible precaution, particularly on an active production website.
Open the WordPress administration area and navigate to Plugins → Add New Plugin. Choose the option to upload a plugin and select the WPZone Neon Clock ZIP package from your computer. WordPress will upload and extract the files automatically.
After installation finishes, select Activate Plugin. Once activated, the configuration screen becomes available under Settings → WPZone Neon Clock.
The plugin does not require a separate external account, API configuration, or complicated setup process for its clock functionality. The main configuration happens directly inside WordPress.
Finding the Settings Page
Open:
WordPress Dashboard → Settings → WPZone Neon Clock
The settings screen contains the controls needed to determine how the clock behaves on the front end.
You will find options for automatic display, display locations, neon color, and content position. The page also shows the [wpzone_clock] shortcode for manual placement.
After changing a configuration option, remember to save the settings before testing the website.
Start With a Simple Configuration
When testing the plugin for the first time, avoid enabling every location immediately. A simpler configuration makes it easier to understand where the clock appears.
For example, you can select Single Posts, choose Blue, and save the settings. Then open one published post on the front end and confirm that the clock appears where expected.
After confirming the basic setup, additional locations can be enabled individually. This approach is particularly useful on websites with custom templates, page builders, caching systems, or complex sidebar configurations.
Understanding Automatic Display
The Automatic Display option allows WPZone Neon Clock to insert the clock into supported content automatically. This is useful when you want the clock to appear without manually adding a shortcode to each article or page.
After enabling automatic display, choose one or more locations where the clock should be allowed to appear. The plugin checks the current WordPress context before inserting its markup.
This location-aware behavior is important. A WordPress front page, individual post, archive, search page, and 404 template are different contexts. Treating them separately gives the administrator much more control over the final design.
Front Page
Enable Front Page when you want the clock available on the website’s main front page.
This setting is separate from Single Posts. That distinction became especially important during development because a blog-style front page may contain multiple post entries even though the visitor has not opened an individual article.
Version 1.3.x contains logic designed to keep those contexts separate. Enabling Single Posts should not automatically mean that the clock needs to appear among posts displayed on the homepage.
This is particularly useful for traditional WordPress blogs where the front page lists recent articles.
Single Posts
The Single Posts setting targets individual WordPress posts.
A visitor must open a single post for this location to match. This makes it suitable for technology tutorials, news articles, blog posts, gaming guides, or other standard post content.
For example, a website owner may want the neon clock visible while readers browse articles but prefer a cleaner homepage. In that situation, Single Posts can be selected while Front Page remains disabled.
This separation provides considerably more control than applying the same output globally.
Pages
Selecting Pages allows the plugin to target standard WordPress pages.
Depending on the website, these may include About pages, informational pages, landing pages, resource pages, or other content created with the WordPress Page post type.
The front page receives separate handling. Therefore, a static page configured as the site’s homepage can still be controlled using the dedicated Front Page option rather than being treated like every other normal page.
Category and Archive Pages
The Category / Archive option extends automatic display to archive-style WordPress views.
Archive pages often behave differently from individual posts because themes commonly display excerpts instead of complete post content. WPZone Neon Clock includes separate handling for excerpt-based archive output.
The plugin also limits its automatic excerpt insertion so that it does not blindly repeat the clock beside every excerpt on the same archive page. This design helps avoid a page filled with duplicate clocks.
Search Results
WordPress search pages frequently use excerpts as well. WPZone Neon Clock therefore handles search results similarly to archive output when automatic display is enabled.
This can be useful on websites where the clock is intended to remain part of the visual interface while users navigate between different content types.
Nevertheless, search templates vary significantly between WordPress themes. Website owners should always test the result with their active theme after enabling this option.
404 Page
The settings panel also contains a 404 Page option.
A 404 page appears when someone requests a URL that WordPress cannot resolve to available content. Depending on the theme, adding a visual element such as a clock can help maintain the site’s design even on an error page.
Because 404 templates differ widely, appearance may depend on how the active theme outputs its content area. Testing remains the best way to confirm the result.
Using the WPZone Neon Clock Shortcode
The shortcode provides another way to place the clock within WordPress.
Use:
[wpzone_clock]
This shortcode can be added to a compatible WordPress content or widget area that processes shortcodes. It is particularly useful when you want more control over the physical location of the clock than automatic before-or-after content placement provides.
For example, a theme may offer a sidebar block where a Shortcode block can be inserted. Adding [wpzone_clock] there allows the clock to become part of the sidebar rather than the main article content.
Important Shortcode Behavior in Version 1.0.0
Version 1.0.0 includes an important visibility change for shortcode usage in sidebars and widgets.
A manually placed shortcode now respects the display locations selected in the WPZone Neon Clock settings. This means that adding [wpzone_clock] to a sidebar does not necessarily force the clock to appear everywhere that sidebar exists.
Imagine that the shortcode is placed in a global sidebar, but only Single Posts is checked in the plugin settings. The sidebar itself may exist on the homepage and on individual articles. However, WPZone Neon Clock can hide its clock output on the front page while allowing it on individual posts.
This solves a common WordPress problem. Themes frequently reuse one sidebar across multiple page types. Without location-aware shortcode logic, administrators would need separate sidebars, additional visibility plugins, custom PHP conditions, or theme-specific rules.
Automatic Display Is Different From Shortcode Placement
There is also an important distinction between the Automatic Display switch and a manually inserted shortcode.
Automatic Display controls automatic content insertion. The shortcode represents a placement chosen manually by the website administrator.
In version 1.0.0, a shortcode placed in a sidebar or widget can still use the configured location rules even when the global Automatic Display feature itself is not required for that manual placement.
This gives the plugin two complementary workflows. Automatic display is useful when WordPress should inject the clock for you, while shortcode placement works well when you have already selected an exact widget or content position.
Why This Matters for WordPress Sidebars
Sidebars are frequently global. A GeneratePress configuration, for example, may use the same right sidebar across many types of pages.
Suppose you add the clock shortcode to that sidebar and want it only on individual articles. A basic shortcode would normally render wherever the sidebar appears.
With WPZone Neon Clock 1.0.0, the plugin checks whether the current page matches the selected display locations. This makes the shortcode much more practical for shared widget areas.
The result is simpler administration because visibility can be controlled from one plugin settings screen.
Choosing a Neon Color
A neon clock works best when it complements the surrounding design. WPZone Neon Clock currently provides four predefined choices: Blue, Red, Yellow, and Green.
The colors affect both the main digital time and the date below it. The styling also includes a glow effect to create the characteristic neon appearance.
Because these options are built into the plugin, changing the color does not require editing CSS. Open the settings page, choose a color, save the configuration, and reload the front end.
Blue Neon
Blue is the default color and arguably the most natural fit for a technology-oriented design.
It works particularly well against dark backgrounds because the bright cyan-blue digits create strong contrast. Gaming websites, technology blogs, server dashboards, and modern personal websites can all make good use of this appearance.
The date receives a lighter blue treatment so it remains visually connected to the main time without competing with the larger digits.
Red Neon
Red creates a stronger and more dramatic appearance.
It can work well on black or dark-gray backgrounds, particularly on gaming, automotive, cyber-themed, or entertainment websites. Because red naturally attracts attention, website owners should consider the surrounding layout before using it in a busy sidebar.
A highly saturated clock next to several bright banners can become distracting. On a cleaner dark layout, however, red can produce a strong visual result.
Yellow Neon
Yellow provides a warmer digital-display appearance.
Depending on the website design, it can resemble classic illuminated displays while still retaining the modern glow effect. It can be useful when blue does not match the site’s existing accent colors.
Contrast should always be checked after selecting a color. Theme backgrounds, widget colors, and custom CSS can influence how any neon effect appears.
Green Neon
Green offers the familiar terminal-style or retro-computing aesthetic that many technology users recognize immediately.
It works especially well for websites inspired by command-line interfaces, coding, system administration, cybersecurity aesthetics, or classic computer displays.
The bright green digits remain visually distinctive against the plugin’s dark background while the lighter date remains readable below them.
Responsive Design for Desktop and Mobile
A digital clock with large numbers creates a particular responsive-design challenge. The digits must remain large enough to look impressive, but they cannot become wider than the container holding them.
This issue becomes especially noticeable in WordPress sidebars. A clock that looks perfect in the main content area may overflow when moved into a 250-pixel or 300-pixel sidebar.
WPZone Neon Clock includes responsive CSS intended to adapt the clock to different available widths. The main display uses responsive sizing rather than relying exclusively on one fixed desktop font size.
The plugin also contains specific sidebar rules for common widget and sidebar containers. This helps the time remain inside narrower layouts on desktop while preserving the overall neon appearance.
Sidebar-Specific Sizing
Version 1.0.0 includes CSS inherited from the sidebar fitting improvements made during the plugin’s development.
The stylesheet recognizes several common WordPress sidebar structures, including widget areas and left or right sidebar containers. Within those contexts, the clock can use more conservative sizing than it would in a large content container.
This matters because a time such as 20:58:49 contains eight visible characters when the separators are included. Large digital digits can therefore require considerable horizontal space.
The plugin reduces that problem by adjusting typography according to the available context.
Mobile Behavior
Responsive design is equally important on smartphones.
A mobile viewport has much less horizontal space than a desktop article area. The clock therefore uses scalable typography and a layout designed to keep the time on a single line whenever the available width permits.
The date sits underneath the main display, which prevents the entire component from becoming unnecessarily wide.
Website owners should still test their own configuration on several screen sizes. WordPress themes can add different padding, margins, borders, and widget widths, so no plugin can predict every possible theme layout.
Test More Than One Screen Size
After installing the plugin, test at least a normal desktop width, a narrow desktop sidebar, a tablet width, and a smartphone width.
Also check both portrait and landscape orientation if mobile visitors represent a meaningful portion of the audience.
Chrome, Edge, Firefox, and other modern browsers include responsive developer tools that can help with these checks without requiring several physical devices.
Before Content or After Content
When Automatic Display is enabled, WPZone Neon Clock provides two position choices: Before Content and After Content.
Before Content places the clock ahead of the main content generated by WordPress for the matching page. After Content appends it after that content.
The better choice depends on the website design. A clock positioned before content becomes much more prominent. It may work well on a dedicated technology page or a design where the clock acts as part of the header-like presentation.
After Content is generally more subtle because visitors encounter the main article first.
When Before Content Works Best
Before Content can be effective when the clock is part of the site’s visual identity.
For example, a technology blog may intentionally place a futuristic clock above every tutorial. The element becomes immediately visible and creates a consistent visual pattern between articles.
However, content-focused websites should consider whether a large decorative element above every article might delay access to the information visitors came to read.
Design should support usability rather than compete with it.
When After Content Works Best
After Content works well when the clock is secondary.
Visitors can read the article normally and encounter the clock at the end. This preserves the traditional content hierarchy while still providing the visual component.
It can also be useful for testing the plugin initially because the clock is less likely to interfere with headings, featured images, advertisements, or other above-the-fold elements.
How WPZone Neon Clock Works Behind the Scenes
WPZone Neon Clock is relatively straightforward internally. WordPress handles configuration, placement decisions, HTML generation, and loading the required assets. JavaScript handles the changing time in the visitor’s browser.
This separation keeps the clock implementation understandable. The PHP side does not need to generate a fresh server response every second.
When the plugin determines that the clock should appear, it outputs a container for the hours, minutes, seconds, and date. It then loads the plugin’s stylesheet and JavaScript.
The script finds each clock instance and updates its displayed values.
Updating Every Second
Once the page is ready, the script performs an initial time update and then continues updating the clock approximately every second using the browser’s timer functionality.
Hours, minutes, and seconds are padded to two digits. Therefore, a value such as eight hours, five minutes, and nine seconds appears in a conventional digital-clock format.
The weekday is abbreviated using familiar English forms such as SUN, MON, TUE, WED, THU, FRI, and SAT.
The date uses a day/month/year presentation underneath the clock.
Assets Load When the Clock Is Rendered
The plugin registers its stylesheet and JavaScript through WordPress. The assets are then enqueued when the clock markup is generated.
This is a useful implementation detail because the clock requires both styling and JavaScript to provide its intended appearance and live functionality.
Without CSS, the output would lose the neon presentation. Without JavaScript, the placeholder time would not become the visitor’s live clock.
Settings Are Sanitized
The plugin’s settings are registered through WordPress and processed through a sanitization callback.
Boolean-style display options are normalized, the color value is limited to the supported choices, and the position setting is constrained to the supported before-or-after values.
Input validation is an important habit in WordPress development. Even small plugins should avoid trusting arbitrary settings values when a limited set of valid choices exists.
What Changed in WPZone Neon Clock 1.0.0?
Version 1.0.0 focuses on an important visibility issue involving manually placed shortcodes, especially in shared WordPress sidebars and widget areas.
The underlying problem is common in WordPress. A sidebar can be used on several page types. Therefore, adding a shortcode to that sidebar normally makes the shortcode available wherever the sidebar itself appears.
That behavior is not always desirable. A website owner may want the same sidebar structure throughout the site but only want the neon clock visible on certain page types.
Version 1.0.0 addresses this by making shortcode output respect the location selections configured in the plugin dashboard.
Sidebar Shortcodes Respect Location Settings
Consider this configuration:
Front Page: Disabled
Single Posts: Enabled
Pages: Disabled
Now imagine [wpzone_clock] is placed inside a sidebar that exists on both the homepage and individual posts.
With the version 1.0.0 location logic, the clock can remain hidden on the front page while appearing when someone opens an individual post.
This provides much finer control without requiring the administrator to duplicate sidebars or install another visibility-management plugin simply for the clock.
The Earlier Front-Page Fix
The plugin history also notes an important fix introduced in version 1.3.0.
Single Posts should represent individual post views. However, a WordPress homepage can itself contain a list of posts. The plugin therefore needs to distinguish a post displayed within a homepage loop from an actual single-post view.
The updated logic creates a stricter separation between the homepage or posts index and individual posts.
As a result, selecting Single Posts does not mean that the clock should automatically appear alongside post listings on the front page when Front Page is disabled.
Why These Small Fixes Matter
Visibility bugs can make a simple widget surprisingly frustrating.
A clock that unexpectedly appears on the homepage may disrupt a carefully designed front-page layout. Conversely, a shortcode that ignores the administrator’s location settings removes much of the value of having those settings in the first place.
The recent fixes make the display model more predictable. Administrators select the page contexts where the clock belongs, and the plugin uses those choices when determining whether it should produce visible output.
Recommended Setup for a WordPress Sidebar
One practical configuration is to use WPZone Neon Clock inside a sidebar on individual blog posts.
First, open Settings → WPZone Neon Clock and select Single Posts as the desired display location. Leave Front Page disabled if you do not want the clock on the homepage.
Next, select your preferred neon color. Blue is a good starting point because it provides the classic appearance associated with the plugin.
Then add [wpzone_clock] to a Shortcode block or another compatible sidebar element provided by your WordPress theme.
Because version 1.0.0 applies the configured location rules to shortcode output, the clock can remain limited to the selected contexts.
A Good Configuration for GeneratePress
GeneratePress users commonly place widgets in a right or left sidebar beside individual posts.
WPZone Neon Clock includes responsive rules that specifically account for common sidebar and widget-area class structures. This helps prevent the large digital digits from overflowing their container on desktop layouts.
Still, GeneratePress installations can vary significantly because users may change container widths, sidebar percentages, spacing, typography, or child-theme CSS.
After placing the shortcode, inspect several posts and resize the browser window. Confirm that the entire HH:MM:SS display remains visible.
Avoid Duplicating Automatic and Manual Placement
If you have manually placed [wpzone_clock] in a sidebar, consider whether you also need Automatic Display on the same page type.
Using both methods can potentially produce more than one clock because they represent separate placement mechanisms.
For a sidebar-only design, the cleanest approach is usually to rely on the shortcode placement and configure the desired display locations accordingly.
For a clock that belongs directly before or after article content, Automatic Display may be the more convenient choice.
Choose the method that matches the layout instead of enabling features unnecessarily.
Performance Considerations
Performance matters on every WordPress website, even for small plugins.
WPZone Neon Clock has a relatively focused task. It does not need to load a large image gallery, video player, external feed, map service, or complex JavaScript framework simply to display the time.
The clock’s ongoing update occurs in the browser. This avoids repeated requests to WordPress every second.
The visual glow comes primarily from CSS rather than large graphical assets, which also helps keep the feature relatively lightweight.
JavaScript Runs in the Browser
The clock’s JavaScript updates the hours, minutes, seconds, and date locally.
This means the WordPress server is not queried once per second. Such an implementation would be unnecessary and inefficient for a visual clock.
Instead, after the page and plugin assets have loaded, the browser handles the changing display.
This architecture is appropriate for a visitor-local clock and reduces the need for ongoing server interaction.
No External Time API Required
The current implementation does not require an external time API to produce the displayed clock.
That keeps configuration simple and avoids creating a dependency on a third-party time service for normal operation.
It also means there are no API credentials to configure simply to display the visitor’s local device time.
However, the tradeoff is important: the plugin is not independently verifying the accuracy of the visitor’s system clock. If the device time is wrong, the displayed time can also be wrong.
Caching Compatibility
Because the visible time is calculated in JavaScript after the page loads, normal page caching does not inherently mean visitors must see the time that existed when a cached HTML page was created.
The browser updates the clock dynamically.
This design is useful for WordPress websites using page caching because the dynamic display does not depend on WordPress regenerating the complete page every second.
Nevertheless, aggressive optimization tools that delay, combine, or alter JavaScript can occasionally affect front-end scripts. If the clock does not update after enabling a new optimization setting, exclude or test the relevant plugin script before assuming the clock itself is broken.
Accessibility and Usability
Visual effects should never make basic information difficult to read.
WPZone Neon Clock uses strong contrast between the neon digits and the dark clock background. The main time receives the strongest emphasis, while the date uses a smaller presentation below it.
The generated clock container also includes an accessibility label identifying the component as a digital clock.
However, accessibility is broader than a single attribute. Theme colors, surrounding content, zoom levels, screen size, and custom CSS can all affect the final user experience.
Keep the Clock Decorative When Appropriate
For many websites, the clock is primarily a decorative interface element rather than essential information.
That distinction matters. Visitors should not need to read the clock to understand an article, complete a purchase, navigate the website, or access important instructions.
When used as a complementary feature, the plugin can add personality without becoming an obstacle.
Check Contrast After Custom Theme Changes
The included neon presets are designed around the clock’s own dark presentation, but custom theme CSS can override plugin styling.
After making global CSS changes, verify that the digits and date remain readable.
This is particularly important if your optimization or theme system uses broad selectors affecting text shadows, font sizes, line heights, backgrounds, or widget padding.
Troubleshooting WPZone Neon Clock
Most clock problems can be narrowed down by checking three areas: visibility settings, placement method, and front-end asset loading.
If the clock does not appear, begin with the plugin’s location settings. A shortcode may exist in the sidebar, but version 1.0.0 intentionally returns no visible clock when the current page does not match one of the selected display locations.
For example, if only Single Posts is enabled and you test the homepage, an absent clock may indicate correct behavior rather than an error.
The Shortcode Shows Nothing
First, verify that the current page type is enabled under Settings → WPZone Neon Clock.
If you inserted [wpzone_clock] into a sidebar and selected only Single Posts, open an actual individual WordPress post.
Do not use the homepage as the only test because the plugin intentionally separates those contexts.
Also confirm that the content area where you inserted the shortcode actually processes WordPress shortcodes.
The Clock Appears Twice
A duplicate clock may occur when the administrator uses more than one placement method.
For example, Automatic Display might insert a clock into the article while [wpzone_clock] creates another in the sidebar.
Decide whether you want automatic content placement, manual shortcode placement, or intentionally want both.
If only one clock is desired, disable the unnecessary placement method.
The Clock Does Not Update
If the clock appears but remains at a placeholder value, JavaScript may not be executing correctly.
Check the browser console for script errors. Temporarily disable JavaScript optimization, delay, or combination features if you use a performance plugin.
Clear page cache, browser cache, and CDN cache when applicable after changing front-end files.
Then reload the page and test again.
The Clock Is Too Wide
If the digital time exceeds the available sidebar width, first confirm that the current plugin stylesheet is loading.
Version 1.0.0 contains sidebar-oriented responsive rules designed to reduce this problem.
Next, inspect whether custom theme CSS is overriding the plugin’s font sizing, width, spacing, or box-sizing rules.
Very narrow custom sidebars may still require site-specific CSS because WordPress themes can create virtually any container width.
The Clock Appears on the Wrong Page
Review the selected display locations.
Front Page and Single Posts are intentionally separate. Pages are also separate from the front page. Archives, search results, and 404 pages each have their own conditions.
Save the settings again after making changes and clear caches before retesting.
For shortcode installations, remember that version 1.0.0 also applies those location selections to the shortcode output.
Ideas for Using WPZone Neon Clock
The clock can fit several types of websites without becoming the main purpose of the page.
A gaming blog can place a green or blue clock beside recent gaming guides. A technology website can use blue neon to complement a dark sidebar. A retro-computing project can use green for a terminal-inspired design. An automotive website may prefer red for a dashboard-like appearance.
Personal blogs can also use the clock as a small visual signature, especially when the site already uses dark backgrounds and bright accent colors.
The most effective implementations tend to treat the clock as part of the design system rather than an unrelated widget added simply because space is available.
Gaming Websites
Gaming websites are a natural match for neon design.
Blue, green, and red lighting effects frequently appear in gaming hardware, streaming rooms, keyboards, and modern interface designs. A digital clock can therefore fit naturally beside gaming news, esports articles, or hardware tutorials.
For the best result, avoid surrounding it with too many other animated elements.
Technology Blogs
A clean technology blog can use the clock to make an otherwise static sidebar more distinctive.
The blue preset pairs especially well with dark-gray or black backgrounds, while green can create a system-monitoring aesthetic.
Because the plugin also displays seconds, the component remains visibly active while someone reads an article.
Personal Websites
A personal website has more freedom to use unusual design elements.
The clock can become part of a personal site’s identity, particularly if the author enjoys computing, gaming, neon artwork, or digital interface design.
Shortcode placement is useful here because the site owner can choose a specific theme area rather than automatically adding the clock to every content page.
Frequently Asked Questions
What is WPZone Neon Clock?
WPZone Neon Clock is a WordPress plugin that displays a responsive neon-style digital clock. It shows hours, minutes, seconds, an abbreviated weekday, and the current date.
What is the current version covered by this guide?
This guide covers WPZone Neon Clock version 1.0.0.
What shortcode does WPZone Neon Clock use?
The shortcode is:
[wpzone_clock]
It can be placed in compatible WordPress content areas or widgets that support shortcode processing.
Which neon colors are available?
Version 1.0.0 provides four built-in color options: Blue, Red, Yellow, and Green.
Can I display the clock only on individual posts?
Yes. Enable Single Posts in the plugin’s display-location settings and leave unwanted locations disabled.
Version 1.0.0 also allows a shortcode placed in a shared sidebar or widget to respect these location selections.
Can I hide the clock from the homepage?
Yes. Leave Front Page disabled.
The plugin contains logic that distinguishes the front page or posts index from individual single-post views.
Does the clock work in a sidebar?
Yes. The shortcode can be used in compatible sidebar or widget areas, and the plugin includes responsive CSS intended to handle narrower sidebar widths.
The exact appearance can still depend on your theme’s sidebar width and custom CSS.
Does the clock use WordPress server time?
The live display is generated with JavaScript using the visitor’s browser environment. Therefore, it follows the local time configured on the visitor’s device rather than acting as a fixed server-time display.
Does it require an external API?
No external time API is required for the current clock functionality.
Can the clock appear automatically?
Yes. Enable Automatic Display and select the desired locations. You can also choose whether the automatically inserted clock appears before or after the content.
A Small Plugin With Precise Display Control
WPZone Neon Clock demonstrates that a WordPress feature does not need to be enormous to be useful. Its purpose is clear: display an attractive live digital clock while giving the site administrator practical control over where that clock appears.
Version 1.0.0 combines a responsive neon display with hours, minutes, seconds, weekday, and date information. Four color presets make the design adaptable, while automatic placement and shortcode support provide two different ways to integrate the clock into a WordPress layout.
The location controls are particularly useful. Front Page, Single Posts, Pages, Category / Archive, Search Results, and 404 Page can be treated separately. The version 1.0.0 shortcode behavior further improves this model by allowing sidebar placement to respect those configured locations.
For WordPress users who want a modern clock without turning the feature into a complicated configuration project, WPZone Neon Clock offers a focused approach. Install it, choose the locations, select a neon color, decide between automatic or shortcode placement, and test the result across desktop and mobile layouts.
⚠️ Disclaimer and Source Hygiene
This article documents WPZone Neon Clock based primarily on the functionality present in the WPZone Neon Clock v1.0.0 plugin package reviewed for this guide. WordPress themes, custom CSS, caching plugins, JavaScript optimization systems, page builders, and future plugin releases can change how a feature behaves on a specific website.
Always create an appropriate backup before installing or updating plugins on an important production website. Test significant changes on a staging environment when possible. For security, compatibility, server configuration, or business-critical WordPress environments, consult a qualified WordPress developer or hosting professional when necessary.
🔔 For more tutorials like this, consider subscribing to our blog.
📩 Do you have questions or suggestions? Leave a comment or contact us!
🏷️ Tags: WPZone Neon Clock, WordPress clock plugin, digital clock WordPress, neon clock plugin, WordPress shortcode, WordPress sidebar clock, responsive WordPress plugin, WordPress widgets, digital clock plugin, WPZone plugins
📢 Hashtags: #WPZone, #WordPress, #WordPressPlugin, #NeonClock, #DigitalClock, #WordPressTips, #WordPressTutorial, #WebDesign, #WordPressDevelopment, #WPZoneBlog
Sources and References
The primary technical reference for this article is the WPZone Neon Clock v1.0.0 plugin package. The plugin’s PHP source defines its WordPress settings, supported display locations, shortcode behavior, automatic placement logic, supported colors, position settings, and asset loading.
The included JavaScript defines the live browser-side time display, one-second updates, abbreviated English weekdays, and day/month/year date formatting. The included CSS provides the neon appearance and responsive behavior, including additional rules intended for narrow WordPress sidebar and widget containers.
General WordPress installation, shortcode, plugin, theme, caching, and testing recommendations should always be compared with the documentation for the WordPress version, theme, hosting environment, and optimization tools currently used on the website.
Secondary Sources and Testimonials
Real-world behavior can vary between WordPress installations because themes control content widths, sidebar structures, widget markup, typography, and responsive breakpoints. Page builders and optimization plugins can also alter when CSS and JavaScript assets are loaded or executed.
For that reason, practical testing remains an important secondary source of compatibility information. Test the clock on the front page, a single post, a normal page, archive views, search results, the 404 template, and any sidebar where the shortcode is used. Desktop, tablet, and mobile testing can reveal layout interactions that cannot be predicted from plugin code alone.
No fabricated user testimonials or unsupported performance claims have been included in this article. Future testimonials should represent genuine user experiences and should clearly identify the plugin version and relevant WordPress environment whenever those details affect the reported behavior.
