


⏲️ Estimated reading time: 7 min
Table of Contents
Yoast SEO Indexation: Complete Guide to Optimizing and Reprocessing Your SEO Data. Yoast SEO requires data indexation to improve search optimization and internal linking analysis. This guide explains how to run the SEO data optimization, background indexing, and WP-CLI commands to ensure your site is fully optimized for search engine performance.
Yoast SEO Data
One of the most important but often overlooked features of the Yoast SEO plugin is its SEO data optimization and indexation process. Whether you run a personal blog or a large-scale website with thousands of posts, Yoast needs to build and maintain an internal index of your content. This index powers many of the plugin’s advanced features, including:
- Internal linking suggestions
- Content insights and keyword analysis
- Faster SEO checks on large sites
- Enhanced breadcrumb structure
- Efficient processing of redirects and canonical tags
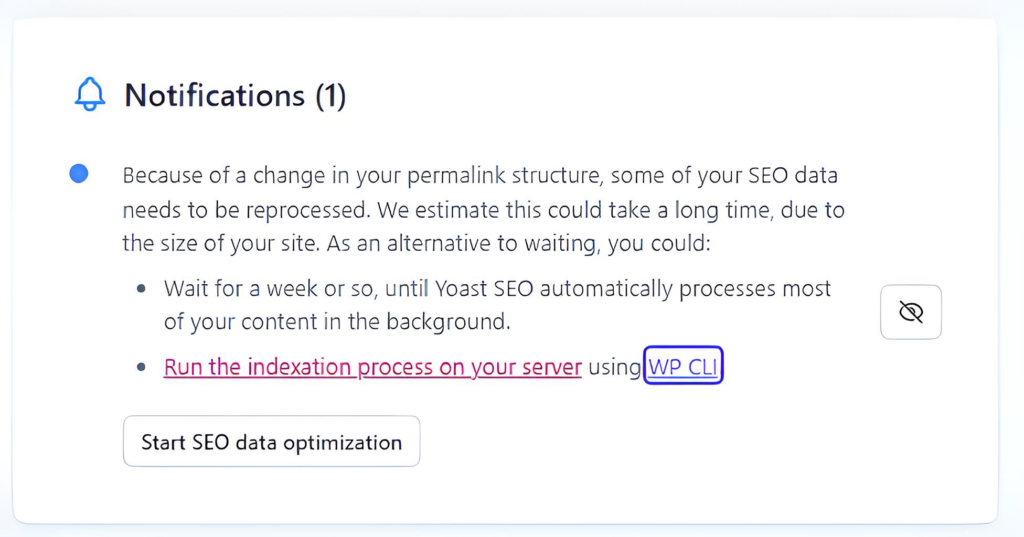
If your permalink structure changes, or you’ve just installed Yoast SEO for the first time, the plugin will notify you that your SEO data needs to be reprocessed. You may also see a message in the WordPress dashboard exactly like the one shown in the screenshot above prompting you to either wait for background processing or run the optimization manually.
In this comprehensive guide, we’ll walk step by step through all methods of Yoast SEO indexation, including:
- Understanding why SEO data optimization is necessary.
- Running the process manually from the WordPress dashboard.
- Allowing Yoast to process data automatically in the background.
- Running indexation via WP-CLI for speed and efficiency.
- Troubleshooting common indexation errors.
- Best practices for keeping your Yoast index up to date.
By the end, you’ll know exactly how to handle indexation on any size website, ensuring your SEO data remains clean, fast, and reliable.
Why Does Yoast SEO Need Indexation?
Yoast SEO works by analyzing your site content. However, instead of scanning every single post each time you load a page, it builds an internal index of SEO data. This internal table allows Yoast to:
- Store SEO metadata efficiently in the database.
- Reuse this data for readability and keyword analysis.
- Provide faster performance when checking multiple posts.
- Offer accurate internal linking suggestions based on stored word relationships.
- Improve large site scalability.
Without indexation, your SEO dashboard can become sluggish, and features like the SEO analysis may not provide accurate results.
When Indexation Is Required
Yoast will typically prompt you to reindex when:
- You install or update Yoast SEO for the first time.
- You make a change to the permalink structure.
- You migrate your site or import/export SEO settings.
- Yoast updates its SEO schema and requires new data processing.
When this happens, you’ll see a notification in your WordPress dashboard with a button that says Start SEO data optimization.
Method 1: Running SEO Data Optimization from the Dashboard
The easiest way to start the process is directly in your WordPress admin area.
Steps:
- Log into your WordPress dashboard.
- Go to Yoast SEO → Tools → SEO Data Optimization.
- Click on Start SEO data optimization.
- Yoast will begin scanning and processing your content.
What Happens Next?
- Yoast creates or updates its internal index tables.
- All posts, pages, and custom post types are scanned.
- Metadata such as keywords, readability scores, and internal link structures are stored.
- Progress is shown on-screen with a status bar.
⚠️ On large sites (10,000+ posts), this process may take a very long time, and it can time out if your server has limited resources. In that case, you may need to use the WP-CLI method (explained below).
Method 2: Automatic Background Indexation
If you don’t start the process manually, Yoast SEO will automatically run the indexation process in the background using WP-Cron.
How It Works:
- Yoast schedules background jobs through WordPress’s built-in cron system.
- Small batches of posts are processed during low-traffic times.
- Over the course of a few days to a week, your site will be fully indexed.
Pros and Cons
✅ Pros:
- No technical knowledge required.
- Automatic and safe for small sites.
- No heavy load on the server at once.
❌ Cons:
- Very slow for large sites.
- Dependent on WordPress cron (which requires traffic to trigger).
- Cannot easily monitor progress.
If your site is large, you’ll likely prefer the WP-CLI method for speed.
Method 3: Running Indexation with WP-CLI
For professional site managers and developers, WP-CLI is the fastest way to process SEO data.
WP-CLI is a command-line tool for managing WordPress installations. With it, you can run Yoast indexation commands directly on your server, bypassing the need to wait for background jobs.
Requirements
- SSH access to your server.
- WP-CLI installed (
wp --infoto confirm). - Correct PHP version (Yoast supports PHP 7.4+).
Basic Command
wp yoast index
This runs the indexation process immediately on all posts, pages, and taxonomies.
Additional Options
--reindex→ Forces a full reindex of all content.--skip-confirmation→ Skips interactive confirmation prompts.--network→ Runs across a WordPress Multisite network.
Example full command:
wp yoast index --reindex --skip-confirmation
This will completely rebuild the Yoast index without asking you to confirm.
Why WP-CLI Is Faster
Unlike background cron jobs, WP-CLI runs directly on the server and doesn’t depend on visitors or timeouts. A site with 100,000 posts can be indexed in minutes instead of days.
Method 4: Troubleshooting Indexation
Sometimes indexation can get stuck or fail. Here’s how to fix common issues.
1 Issue: Indexation Stuck at 0%
- Flush the WordPress cache.
- Disable conflicting plugins.
- Run
wp yoast indexvia WP-CLI to force progress.
2 Issue: Timeout Errors
- Increase PHP
max_execution_time. - Use WP-CLI to bypass web server timeouts.
3 Issue: Missing Internal Links
- Ensure your content is published, not draft.
- Reindex with the
--reindexflag. - Clear Yoast SEO index tables in the database if needed.
Method 5: Best Practices for Maintaining Yoast Indexation
- Reindex after permalink changes: Always reprocess SEO data if URLs are updated.
- Schedule regular checks: Large sites should run
wp yoast indexweekly. - Keep Yoast updated: New versions often improve indexation performance.
- Monitor server logs: Ensure indexation isn’t failing silently.
- Optimize database: Clean post revisions and orphaned metadata to speed reindexing.
Advanced: Database Tables Used by Yoast
Yoast stores its index in special database tables, such as:
wp_yoast_indexable→ Stores indexable content.wp_yoast_indexable_hierarchy→ Tracks parent-child relationships.wp_yoast_primary_term→ Stores primary taxonomy selections.
By keeping these tables optimized and reindexed, your SEO analysis will remain fast and reliable.
Why Indexation Matters for SEO Performance
Running Yoast SEO indexation isn’t just about plugin maintenance it directly impacts your rankings:
- Accurate metadata → Helps search engines interpret your site.
- Faster page analysis → Ensures your SEO scores are up to date.
- Better internal linking → Strengthens your content structure.
- Improved crawl efficiency → Googlebot sees a cleaner architecture.
Skipping this step means your SEO tools and even Google may be working with outdated data.
Final Thoughts
Yoast SEO is one of the most powerful plugins for optimizing WordPress sites, but it relies on accurate and updated indexation to work correctly. Whether you choose the dashboard method, wait for automatic background jobs, or run the WP-CLI command for maximum efficiency, keeping your SEO data optimized is a must.
For small blogs, simply clicking Start SEO data optimization is usually enough. But for large or high-traffic sites, mastering the WP-CLI process will save time and ensure your SEO analysis remains accurate.
By following the steps in this guide, you’ll always have a clean, efficient SEO index that supports stronger search engine rankings and faster site performance.
📌 Wrap-Up
You may also be interested in: What Does It Mean When You Dream About a Person
🔔 For more tutorials like this, consider subscribing to our blog.
📩 Do you have questions or suggestions? Leave a comment or contact us!
🏷️ Tags: Yoast SEO, WordPress SEO, WP-CLI, SEO data optimization, indexation, permalink changes, SEO performance, search engine ranking, internal linking, database optimization
📢 Hashtags: #YoastSEO, #WordPressSEO, #WPCLI, #SEOOptimization, #Indexation, #PermalinkStructure, #SearchRankings, #InternalLinking, #WebsiteOptimization, #WordPress
