


⏲️ Estimated reading time: 16 min
Table of Contents
Hyper-V on Windows: Step-by-Step Install & Optimal Settings. Learn how to install and configure Hyper-V on Windows step by step. This practical guide covers prerequisites, BIOS settings, multiple install methods, networking (NAT/External), storage, checkpoints, security, performance tuning, nested virtualization, and troubleshooting plus a ready-to-paste FAQ schema.
See also: Why You Should Photograph Your Hotel Room Before Checkout
Why Choose Hyper-V for Your Virtualization
Microsoft Hyper-V is a Type-1 (bare-metal) hypervisor included with Windows Pro/Enterprise/Education editions and Windows Server. It’s fast, stable, and tightly integrated with Windows features such as PowerShell, Credential Guard, Device Guard, Windows Defender, and VBS (Virtualization-Based Security). For developers, testers, sysadmins, and homelabbers, it provides an excellent mix of performance, management, and automation.
Compatibility, Editions, and Limitations You Should Know
- Supported client editions: Windows 10/11 Pro, Enterprise, Education.
- Not officially supported: Windows Home (you can enable the hypervisor for WSL2, but Hyper-V Manager isn’t supported on Home).
- CPU requirements: 64-bit CPU with virtualization extensions (Intel VT-x or AMD-V) and SLAT (Second Level Address Translation).
- Memory: At least 8 GB RAM for basic usage; 16 GB+ recommended if you plan to run several VMs.
- Other features that use Hyper-V: Windows Subsystem for Linux 2 (WSL2), Windows Sandbox, Android emulators, some security features. These all rely on the Windows hypervisor and can affect third-party hypervisors.
Tip: If you need VirtualBox/VMware alongside Hyper-V, be aware of performance and driver conflicts. On modern Windows, VirtualBox can run on Hyper-V via WHP, but performance may vary.
1: Verify Hyper-V Requirements in Windows
Run Command Prompt or PowerShell as Administrator and check hardware support:
systeminfo | findstr /i "Hyper-V Requirements"
You should see lines like:
- VM Monitor Mode Extensions: Yes
- Virtualization Enabled in Firmware: Yes
- Second Level Address Translation: Yes
- Data Execution Prevention Available: Yes
If “Virtualization Enabled in Firmware” shows No, enable it in BIOS/UEFI (next step).
2: Enable Virtualization in BIOS/UEFI
- Restart the PC and enter firmware settings (keys vary: Del, F2, F10, F12, Esc).
- Locate CPU or Advanced settings:
- Intel: Intel Virtualization Technology (VT-x), sometimes with VT-d (IOMMU).
- AMD: SVM Mode (AMD-V), IOMMU.
- Enable virtualization and (optionally) IOMMU/VT-d for better device virtualization.
- Save changes and reboot into Windows.
3: Install Hyper-V (Choose Your Preferred Method)
You can install Hyper-V with a GUI or via command line. Pick one approach.
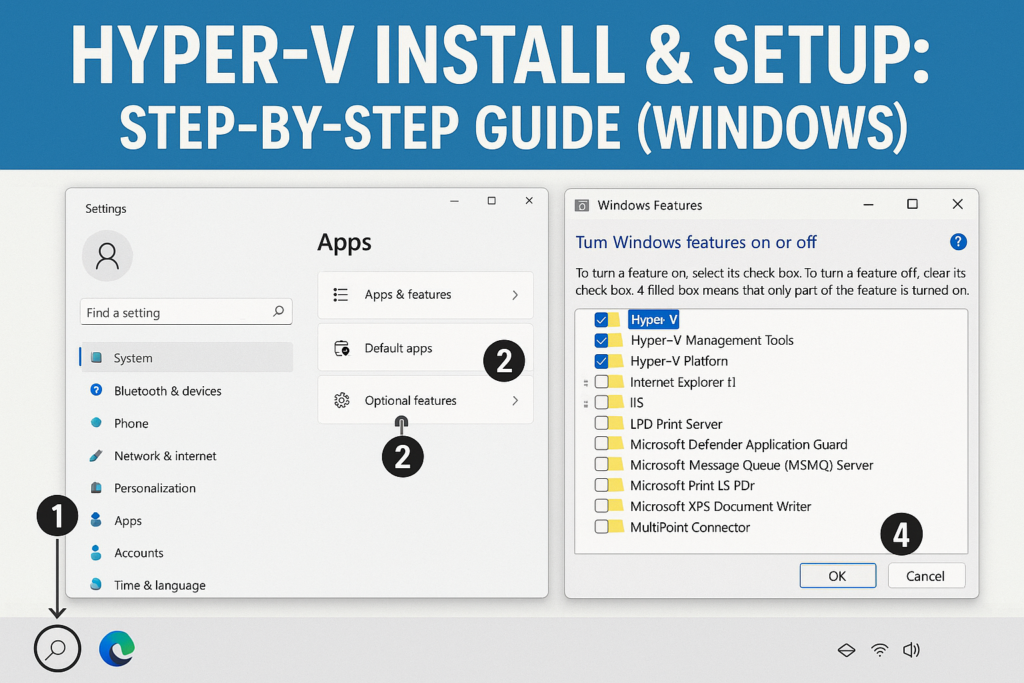
Method A: Turn Windows Features On or Off (GUI)
- Press Win + R, type
optionalfeatures.exe, press Enter. - Check:
- Hyper-V
- Hyper-V Management Tools
- Hyper-V Platform
- Hyper-V
- Click OK, allow Windows to install, then Restart.
Method B: PowerShell (Recommended for Repeatable Setups)
Run PowerShell as Administrator:
Enable-WindowsOptionalFeature -Online -FeatureName Microsoft-Hyper-V -All -NoRestart
Then reboot:
Restart-Computer
Method C: DISM (Deployment Image Servicing and Management)
Run Command Prompt (Admin) or PowerShell (Admin):
DISM /Online /Enable-Feature /All /FeatureName:Microsoft-Hyper-V
Reboot when prompted.
4: Confirm Installation and Open Hyper-V Manager
After reboot:
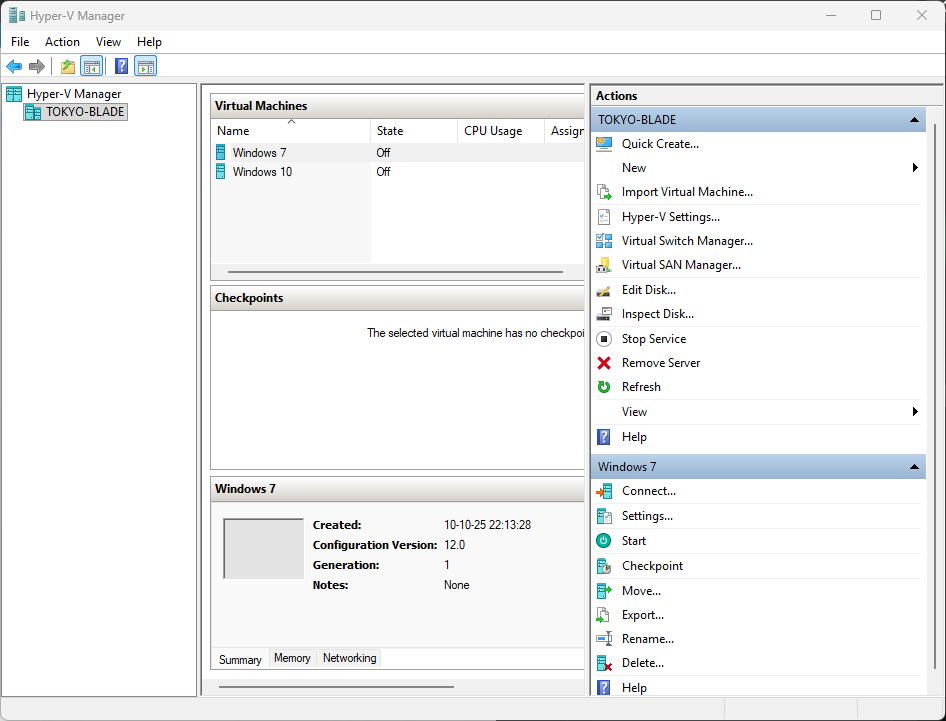
- Press Win, type Hyper-V Manager, open it.
- Or start PowerShell and run:
Get-WindowsOptionalFeature -Online -FeatureName Microsoft-Hyper-V
State should be Enabled.
5: Understand Hyper-V’s Core Concepts
- Host: Your Windows machine running the Hyper-V hypervisor.
- VM (Virtual Machine): A guest OS (Windows/Linux/others) running on the host.
- Generation:
- Gen 1: Legacy BIOS, IDE boot, older guests.
- Gen 2: UEFI, Secure Boot, SCSI boot, modern guests (preferred).
- Virtual Switch:
- External: Bridges to your physical NIC for full LAN/Internet access.
- Internal: Host ↔ VM only; no direct Internet unless routed/NATed.
- Private: VM ↔ VM only; isolated from host and LAN.
- Checkpoints: Snapshots you can revert to. Prefer Production checkpoints for supported OSes.
- Integration Services: Time sync, heartbeat, shutdown, VSS, etc. Built into modern Windows and most Linux distros.
6: Create a Virtual Switch (Networking)
Open Hyper-V Manager → Action → Virtual Switch Manager. Choose one:
External Switch (Most Common)
- Choose your physical network adapter.
- Allow management OS to share network adapter (usually yes).
- Gives VMs full network access via your LAN.
Internal Switch
- Host and VMs can communicate.
- Useful for lab networks. Combine with NAT to reach Internet (see PowerShell method below).
Private Switch
- VMs only talk to each other.
- Useful for isolated testing or malware labs (be careful and follow safe practices).
PowerShell: Create a NAT-Backed Internal Switch
- Create the internal switch:
New-VMSwitch -Name "NATSwitch" -SwitchType Internal
- Assign IP to the host’s vEthernet adapter:
New-NetIPAddress -InterfaceAlias "vEthernet (NATSwitch)" -IPAddress 192.168.100.1 -PrefixLength 24
- Create a NAT network (host performs NAT for VMs):
New-NetNat -Name "NATNetwork" -InternalIPInterfaceAddressPrefix 192.168.100.0/24
- Configure each VM’s NIC to NATSwitch and set the guest IPs (e.g., via DHCP server you run on host/VM, or static IPs like 192.168.100.10/24 gateway 192.168.100.1, DNS your router or 1.1.1.1/8.8.8.8).
7: Plan Storage, Default Paths, and Disk Formats
- Default VM location: Configure once: Hyper-V Manager → Host name → Hyper-V Settings → Virtual Hard Disks & Virtual Machines.
- VHDX vs VHD:
- VHDX (modern): resilient, larger than 2 TB, better alignment recommended.
- VHD (legacy): compatibility with older systems.
- Dynamic vs Fixed:
- Dynamic grows as data is written (saves space, tiny performance penalty).
- Fixed allocates full size immediately (best performance & fragmentation control).
- Separate SSD/NVMe for VM files improves I/O.
- Consider Storage Spaces or ReFS for resiliency (on supported editions).
8: Create Your First VM (GUI and PowerShell)
GUI (Hyper-V Manager)
- Action → New → Virtual Machine.
- Name & Location: Use a clear naming scheme (e.g.,
Lab-Win11-Base). - Generation: Prefer Generation 2 for modern OS; uncheck Secure Boot if your Linux distro isn’t signed.
- Memory: Start with 4096 MB (4 GB) for Windows 10/11, 2048 MB for many Linux distros. Enable Use Dynamic Memory.
- Networking: Select your External or NATSwitch.
- Virtual Hard Disk: Create a new VHDX (e.g., 64–127 GB).
- Install Options: Attach an ISO to install the OS.
- Finish, then Connect and Start to install the OS.
PowerShell (Fast & Repeatable)
# Variables
$VMName   = "Win11-Dev"
$VMPath   = "D:HyperV$VMName"
$VHDPath  = "$VMPath$VMName.vhdx"
$ISOPath  = "D:ISOWindows11.iso"
$Switch   = "NATSwitch"

# Create folders
New-Item -ItemType Directory -Path $VMPath -Force | Out-Null

# Create VM
New-VM -Name $VMName -Generation 2 -MemoryStartupBytes 4GB -BootDevice VHD -Path $VMPath -SwitchName $Switch | Out-Null

# Create VHDX
New-VHD -Path $VHDPath -SizeBytes 127GB -Dynamic | Out-Null
Add-VMHardDiskDrive -VMName $VMName -Path $VHDPath

# CPU cores
Set-VMProcessor -VMName $VMName -Count 4

# Dynamic Memory
Set-VMMemory -VMName $VMName -DynamicMemoryEnabled $true -MinimumBytes 2GB -StartupBytes 4GB -MaximumBytes 8GB

# Attach ISO
Add-VMDvdDrive -VMName $VMName -Path $ISOPath

# Enable Secure Boot for Windows guests (disable for some Linux)
Set-VMFirmware -VMName $VMName -EnableSecureBoot On -SecureBootTemplate "MicrosoftWindows"

Start-VM $VMName
9: Post-Install Guest Settings (Windows & Linux)
Integration Services (Modern OS)
Most modern Windows and Linux distributions include Hyper-V integration drivers. Verify they’re enabled for features like:
- Time synchronization
- Heartbeat
- Data exchange
- VSS (backup)
- Guest services (file copy)
PowerShell:
Get-VMIntegrationService -VMName "Win11-Dev"
Enable any needed service:
Enable-VMIntegrationService -VMName "Win11-Dev" -Name "Guest Service Interface"
Enhanced Session Mode (Windows Guests)
For Windows 8.1/Server 2012 R2 or later guests, Enhanced Session provides clipboard, audio, USB redirection, and dynamic resolution.
- On the host: Hyper-V Settings → Enhanced Session Mode Policy (allow).
- In Hyper-V Manager → host settings → Enhanced Session Mode (use).
Linux Guests
- Use Gen2 with Secure Boot Microsoft UEFI Certificate Authority (or disable Secure Boot) for many distros.
- For dynamic resolution/clipboard, consider xrdp/SSH, or distro-specific tools.
- Install linux-tools/hyperv packages if needed (depends on distro).
10: Checkpoints (Snapshots) – The Right Way
- Production checkpoints (default for supported OS) use VSS/Quiesced states safer for apps and databases.
- Standard checkpoints capture memory state good for quick labs but not ideal for production data consistency.
- Configure per VM: VM Settings → Checkpoints.
- PowerShell:
Set-VM -Name "Win11-Dev" -CheckpointType Production
Checkpoint-VM -Name "Win11-Dev" -SnapshotName "BeforeBigUpdate"
Best practice: Use checkpoints for short-term safety nets. For long-term protection, rely on proper backups/exports or image builds.
11: Optimize CPU, RAM, and I/O for Performance
- CPU:
- Assign enough vCPUs for workload; avoid over-committing heavily on small hosts.
- For nested hypervisors and Android emulators:
Set-VMProcessor -VMName "Win11-Dev" -ExposeVirtualizationExtensions $true
- Memory:
- Use Dynamic Memory with sensible minimum/maximum.
- Keep the host with at least 4–8 GB free for Windows to stay responsive.
- Disk:
- Prefer SSD/NVMe for VMs.
- Use Fixed VHDX for I/O-heavy workloads; Dynamic is fine for general use.
- Periodically Optimize-VHD (offline):
Optimize-VHD -Path "D:HyperVWin11-DevWin11-Dev.vhdx" -Mode Full
- Services: Disable unneeded services in guests. Keep drivers current.
12: Secure Your Hyper-V Host and Guests
- Keep Windows updated (host & guests).
- Use Windows Defender with exclusions for large VM folders, if needed, to avoid performance hits.
- Limit access to Hyper-V Administrators group.
- Use Virtual Switch isolation: Private/Internal labs for risky tests.
- Enable BitLocker on host disks that store VMs (and inside guests when appropriate).
- Use Production checkpoints for data-sensitive workloads.
- Backup VM data regularly (see next step).
13: Backup, Export/Import, and Templates
- Export a VM (cold or live for supported guests):
Export-VM -Name "Win11-Dev" -Path "E:BackupsHyperV" - Import a VM (preserve or register in place):
Import-VM -Path "E:BackupsHyperVWin11-Dev" -Copy - Golden images:
- Build a clean base VM, install updates/tools, generalize (Windows:
sysprep /generalize /oobe /shutdown), then export. - Clone for new environments saves hours.
- Build a clean base VM, install updates/tools, generalize (Windows:
14: Advanced Networking (VLANs, NAT Rules, DHCP)
- VLAN tagging per vNIC (if your switch supports VLANs): VM Settings → Network Adapter → VLAN ID.
- Port forwarding with NAT (to reach services on NATed VMs from the LAN):
- Create a NAT rule exposing the host’s port to the VM’s address:
Add-NetNatStaticMapping -NatName "NATNetwork" -Protocol TCP ` -ExternalIPAddress 0.0.0.0 -ExternalPort 2222 ` -InternalIPAddress 192.168.100.10 -InternalPort 22 - Now
host:2222forwards to VM’s SSH at192.168.100.10:22.
- Create a NAT rule exposing the host’s port to the VM’s address:
- DHCP:
- Internal/Private switches don’t provide DHCP.
- Solutions: Run a lightweight DHCP server in one VM or configure static IPs.
15: Useful Daily PowerShell Commands
# List VMs and state
Get-VM | Select-Object Name, State, CPUUsage, MemoryAssigned

# Start/Stop/Turn off VM
Start-VM -Name "Win11-Dev"
Stop-VM -Name "Win11-Dev" -Force

# Graceful guest shutdown (if integration services allow)
Stop-VM -Name "Win11-Dev" -TurnOff

# Resize a VHDX (offline)
Resize-VHD -Path "D:HyperVWin11-DevWin11-Dev.vhdx" -SizeBytes 200GB

# Add another NIC
Add-VMNetworkAdapter -VMName "Win11-Dev" -SwitchName "External"

# Move VM storage (while off)
Move-VMStorage -VMName "Win11-Dev" -DestinationStoragePath "E:HyperVWin11-Dev"

# Set automatic start/stop
Set-VM -Name "Win11-Dev" -AutomaticStartAction StartIfRunning
Set-VM -Name "Win11-Dev" -AutomaticStopAction Save
16: Common Problems and How to Fix Them
Hyper-V option missing in Windows Features
- You’re likely on Windows Home. Upgrade to Pro/Enterprise/Education to use Hyper-V Manager. (WSL2 still uses the hypervisor but doesn’t give you Hyper-V Manager.)
“Virtualization Enabled in Firmware: No”
- Enable VT-x/SVM in BIOS/UEFI. Save and reboot.
Network suddenly broken after creating External switch
- If you bound the switch to Wi-Fi or a VPN adapter, connectivity can be tricky. Try binding to Ethernet if possible.
- Ensure “Allow management operating system to share this network adapter” is checked, or create a separate dedicated NIC for the VMs.
VirtualBox/VMware slow or won’t start after enabling Hyper-V
- Modern VirtualBox can leverage Hyper-V, but performance may drop. If you must fully disable Hyper-V (e.g., to run low-level VT-x guests), use:
bcdedit /set hypervisorlaunchtype offReboot. To re-enable:bcdedit /set hypervisorlaunchtype auto(Note: This will affect WSL2/Sandbox.)
Linux ISO won’t boot on Gen2 with Secure Boot
- Change Secure Boot template to Microsoft UEFI Certificate Authority or disable Secure Boot for that VM.
Insufficient memory errors
- Lower startup RAM or enable Dynamic Memory. Close RAM-hungry apps on the host.
Time drift in guests
- Ensure Time Synchronization integration service is enabled. For domain-joined servers, rely on domain time hierarchy and adjust Hyper-V time sync accordingly.
17: Sensible Default Settings to Adopt
- Hyper-V Settings (host):
- Change default VM & VHD paths to a fast SSD/NVMe folder with enough space.
- Enable Enhanced Session Mode.
- Per VM:
- Gen2 + VHDX + Dynamic Memory for most general use.
- Production Checkpoints.
- Automatic Start/Stop actions: Start if running; Stop = Save.
- Networking:
- Create one External switch for general use.
- Create one NAT/Internal switch for labs and isolated dev.
- Backups:
- Weekly export for critical VMs.
- Keep base “golden image” templates.
18: Building a Clean Workflow (From Zero to VM in Minutes)
- Prepare host once: paths, switches, templates.
- Maintain an ISO folder with common OS images.
- Create golden images (Windows, Ubuntu, etc.).
- Export templates and keep a small library (e.g.,
Win11-Base,Ubuntu-Base). - Clone via Import → rename → customize.
- Automate with PowerShell (a script that: creates VM, attaches ISO, sets RAM/CPU, switches).
19: When to Use Gen1 vs Gen2
- Gen2: UEFI, Secure Boot, SCSI boot best for most modern OS (Windows 8+ / Server 2012 R2+, most modern Linux).
- Gen1: Older OS (Windows 7/Server 2008 R2, legacy Linux), or when a specific legacy boot method is required.
20: Licensing and Activation Notes (Windows Guests)
- Each Windows VM typically needs its own license and activation.
- For evaluation and testing, use Microsoft Evaluation ISOs (limited time).
- Volume licensing/MAK/KMS may apply for organizations.
21: Lightweight Lab Ideas
- AD + DNS in an Internal network.
- Linux web stack behind a NAT switch with port forwards for HTTP/SSH.
- Dev environment with snapshots before risky updates.
- VPN gateway VM for lab-to-lab links on a Private switch (advanced).
FAQ
Q1: Can I run Hyper-V on Windows Home?
A: Not officially. Hyper-V Manager isn’t available on Home. You can still use WSL2 and some features that rely on the Windows hypervisor, but for full Hyper-V you need Pro/Enterprise/Education.
Q2: Gen1 or Gen2 what should I choose?
A: Gen2 for modern OS (UEFI, Secure Boot, better features). Use Gen1 only for older or legacy systems.
Q3: Why does my External switch kill my Wi-Fi?
A: Binding a virtual switch to Wi-Fi can be finicky. Ensure “Allow management OS…” is enabled, update drivers, or prefer Ethernet if possible.
Q4: Are checkpoints a backup?
A: No. They’re a convenience for short-term rollback. Use Exports and proper backups for long-term protection.
Q5: How many vCPUs should I assign?
A: Start small (2–4). Increase if the workload is CPU-bound. Avoid starving the host.
Q6: My Linux VM won’t boot with Secure Boot.
A: Change Secure Boot template to “Microsoft UEFI CA” or disable Secure Boot for that VM.
Q7: Can I enable nested virtualization?
A: Yes, for supported CPUs.
Set-VMProcessor -VMName "MyVM" -ExposeVirtualizationExtensions $true
Q8: Do I need separate storage for VMs?
A: It’s highly recommended. Use SSD/NVMe for snappy performance and isolation from the OS drive.
Q9: How do I access a NATed VM from my LAN?
A: Add a NAT static mapping (port forward) on the host using Add-NetNatStaticMapping.
Q10: What’s the simplest backup?
A: Stop the VM and Export it to another drive. For frequent changes, schedule regular exports.
Practical Checklist (Quick Recap)
- Check CPU virtualization + SLAT with
systeminfo. - Enable VT-x/SVM in BIOS/UEFI.
- Install Hyper-V via Features/PowerShell/DISM.
- Create External switch and optional NAT/Internal.
- Set default VM/VHD paths on fast storage.
- Create a Gen2 VM, attach ISO, enable Dynamic Memory.
- Choose Production checkpoints.
- Enable Enhanced Session (Windows guests).
- Export templates; schedule backups.
- Keep host and guests updated.
Hyper-V
Hyper-V turns your Windows machine into a capable, enterprise-grade hypervisor with minimal overhead and excellent tooling. By validating hardware support, enabling virtualization, installing Hyper-V through your preferred method, and adopting sane defaults (Gen2, VHDX, Dynamic Memory, Production checkpoints), you can build a clean, fast, and repeatable lab.
Use an External switch for everyday networking and an Internal/NAT switch for safe labs. Keep VM files on fast SSD/NVMe storage, automate with PowerShell, and export “golden images” for instant clones. With these steps, your Hyper-V environment will be stable, secure, and easy to scale perfect for development, testing, and hands-on learning.
⚠️ Disclaimer and Source Hygiene
The information provided in this article, “Hyper-V Install & Setup: Step-by-Step Guide (Windows),” is for general informational and educational purposes only. While we strive to keep the information up-to-date and correct, we make no representations or warranties of any kind, express or implied, about the completeness, accuracy, reliability, suitability, or availability with respect to the website or the information, products, services, or related graphics contained in the article for any purpose. Any reliance you place on such information is therefore strictly at your own risk.
Technical Nature: The content involves system-level changes, including modifications to BIOS/UEFI settings, Windows Features, and network configurations. These procedures carry an inherent risk of data loss or system instability if not performed correctly.
Your Responsibility: It is your responsibility to ensure you have full backups of your important data before attempting any of the steps outlined in this guide. You should also verify that your specific hardware and software configurations are compatible with Hyper-V.
No Professional Advice: The information in this guide does not constitute professional IT consultation. For complex enterprise deployments or critical systems, it is highly recommended to consult with a qualified IT professional.
Third-Party Links (if applicable): This article may include references to external websites or tools. We do not endorse or take responsibility for the content, privacy policies, or practices of these third-party sites.
Changes: We reserve the right to modify or update the content of this guide without prior notice.
By following the instructions in this guide, you acknowledge that you have read this disclaimer and that you assume all responsibility for any outcomes resulting from your actions.
🔔 For more tutorials like this, consider subscribing to our blog.
📩 Do you have questions or suggestions? Leave a comment or contact us!
🏷️ Tags: Hyper-V, Windows 11, Windows 10, Virtualization, PowerShell, NAT Networking, Virtual Switch, Checkpoints, Nested Virtualization, Windows Server
📢 Hashtags: #HyperV, #Windows11, #Windows10, #Virtualization, #PowerShell, #Homelab, #SysAdmin, #Networking, #DevOps, #WindowsServer
