


⏲️ Estimated reading time: 9 min
Table of Contents
Fail2ban Installation and Settings – Step by Step Commands. Fail2ban is a must-have Linux security tool that blocks brute-force attacks by banning suspicious IPs. This complete guide covers installation, configuration, and advanced commands, including scripts to extract banned IP lists and monitor your server’s protection in real time.
Fail2ban
If you manage a Linux server, chances are you’ve seen bots hammering your SSH or FTP service with brute-force attempts. Without protection, your server is at risk. Fail2ban is one of the simplest and most effective solutions. It bans IP addresses after repeated failed logins, greatly reducing your attack surface.
This tutorial explains every step: installation, configuration, essential commands, and advanced scripts to manage and view banned IP addresses.
What is Fail2ban?
Fail2ban is an open-source intrusion prevention framework that:
- Monitors log files for repeated failed authentication attempts.
- Dynamically bans malicious IPs using firewall rules.
- Supports multiple services (SSH, FTP, Apache, Nginx, Postfix, etc.).
- Can notify you via email.
- Runs lightweight and efficiently on VPS and dedicated servers.
Step 1 – Update Your Server
Debian/Ubuntu:
sudo apt update && sudo apt upgrade -y
CentOS/AlmaLinux/RHEL:
sudo dnf update -y
Step 2 – Install Fail2ban
Debian/Ubuntu:
sudo apt install fail2ban -y
CentOS/AlmaLinux/RHEL:
sudo dnf install epel-release -y
sudo dnf install fail2ban -y
Check version:
fail2ban-client -h
Step 3 – Enable
sudo systemctl enable fail2ban
Start and status Fail2ban:
sudo systemctl start fail2ban
sudo systemctl status fail2ban
Step 4 – Configuration Files
- /etc/fail2ban/jail.conf – default (do not edit).
- /etc/fail2ban/jail.local – custom settings (safe to edit).
Step 5 – SSH Protection
Edit jail.local:
sudo nano /etc/fail2ban/jail.local
Example:
[sshd]
enabled = true
port    = ssh
logpath = /var/log/auth.log
maxretry = 5
bantime = 3600
Restart Fail2ban:
sudo systemctl restart fail2ban
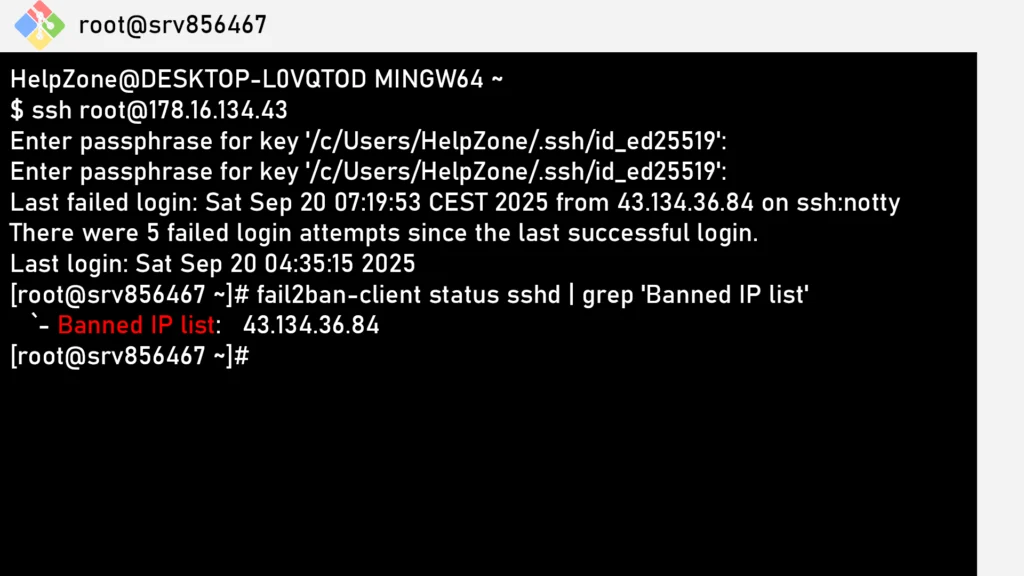
Cmd display Banned IP list
fail2ban-client status sshd | grep 'Banned IP list'
Results
Step 6 – Useful Fail2ban Commands
- Global status:
fail2ban-client status
- Jail status (SSH):
fail2ban-client status sshd
- Manually ban/unban:
fail2ban-client set sshd banip 1.2.3.4
fail2ban-client set sshd unbanip 1.2.3.4
Step 7 – Adjusting Defaults
Edit [DEFAULT] in jail.local:
bantime  = 3600
findtime = 600
maxretry = 5
ignoreip = 127.0.0.1 192.168.1.10
Step 8 – Email Alerts
Install mail utilities:
sudo apt install mailutils -y
Configure jail.local:
destemail = admin@example.com
sender = fail2ban@example.com
action = %(action_mw)s
Step 9 – Protecting Other Services
Fail2ban can guard Apache, Nginx, Postfix, vsftpd and more. Example for Apache:
[apache-auth]
enabled  = true
port     = http,https
logpath  = /var/log/apache*/*error.log
maxretry = 3
Step 10 – Monitor Logs
tail -f /var/log/fail2ban.log
Fail2ban Quick Commands to Check Banned IPs
Here are some practical one-liners and scripts you can use:
See also: Stop Burning Yourself to Keep Others Warm
- Check global status:
fail2ban-client status
- Check SSH jail including banned IP list:
fail2ban-client status sshd
- Extract banned IPs only:
fail2ban-client status sshd | awk -F': ' '/Banned IP list/{print $2}'
- One IP per line:
fail2ban-client status sshd | awk -F': ' '/Banned IP list/{print $2}' | tr ' ' 'n' | sed '/^$/d'
- View history from logs:
grep " Ban " /var/log/fail2ban.log | sed -n 's/.*Ban ([0-9a-fA-F:.]+).*/1/p' | tac | uniq
- Last 20 banned IPs:
grep " Ban " /var/log/fail2ban.log | sed -n 's/.*Ban ([0-9a-fA-F:.]+).*/1/p' | tac | uniq | head -n 20
- Save banned IPs to a file:
(fail2ban-client status sshd | awk -F': ' '/Banned IP list/{print $2}' | tr ' ' 'n' | sed '/^$/d' > /root/banned_ips.txt) || (grep " Ban " /var/log/fail2ban.log | sed -n 's/.*Ban ([0-9a-fA-F:.]+).*/1/p' | tac | uniq > /root/banned_ips.txt)
- View file content:
cat /root/banned_ips.txt
- Helper script:
cat > /usr/local/bin/list-f2b-banned.sh <<'EOF'
#!/bin/bash
OUT=/root/banned_ips.txt
IPS=$(fail2ban-client status sshd 2>/dev/null | awk -F': ' '/Banned IP list/{print $2}')
if [[ -n "$IPS" ]]; then
  echo "$IPS" | tr ' ' 'n' | sed '/^$/d' > "$OUT"
  echo "Wrote live banned IPs to $OUT"
  exit 0
fi
LOG=/var/log/fail2ban.log
if [[ -r "$LOG" ]]; then
  grep " Ban " "$LOG" | sed -n 's/.*Ban ([0-9a-fA-F:.]+).*/1/p' | tac | uniq > "$OUT"
  echo "Wrote fallback banned IPs from log to $OUT"
  exit 0
fi
echo -n "" > "$OUT"
echo "No banned IPs found; wrote empty $OUT"
EOF

chmod 750 /usr/local/bin/list-f2b-banned.sh
Run script:
/usr/local/bin/list-f2b-banned.sh
cat /root/banned_ips.txt
- Direct one-liner (live or fallback):
(fail2ban-client status sshd 2>/dev/null | awk -F': ' '/Banned IP list/{print $2}' | tr ' ' 'n' | sed '/^$/d') || (grep " Ban " /var/log/fail2ban.log | sed -n 's/.*Ban ([0-9a-fA-F:.]+).*/1/p' | tac | uniq)
- Unban IP manually:
fail2ban-client set sshd unbanip 1.2.3.4
- Monitor Fail2ban live log:
tail -f /var/log/fail2ban.log
💡 Tip: You can schedule the script in cron to refresh banned IPs every 2 minutes:
echo '*/2 * * * * /usr/local/bin/list-f2b-banned.sh >/dev/null 2>&1' > /etc/cron.d/f2b-list
These are common Git commands used in various situations:

start a working area (see also: git help tutorial)
   clone     Clone a repository into a new directory
   init      Create an empty Git repository or reinitialize an existing one

work on the current change (see also: git help everyday)
   add       Add file contents to the index
   mv        Move or rename a file, a directory, or a symlink
   restore   Restore working tree files
   rm        Remove files from the working tree and from the index

examine the history and state (see also: git help revisions)
   bisect    Use binary search to find the commit that introduced a bug
   diff      Show changes between commits, commit and working tree, etc
   grep      Print lines matching a pattern
   log       Show commit logs
   show      Show various types of objects
   status    Show the working tree status

grow, mark and tweak your common history
   branch    List, create, or delete branches
   commit    Record changes to the repository
   merge     Join two or more development histories together
   rebase    Reapply commits on top of another base tip
   reset     Reset current HEAD to the specified state
   switch    Switch branches
   tag       Create, list, delete or verify a tag object signed with GPG

collaborate (see also: git help workflows)
   fetch     Download objects and refs from another repository
   pull      Fetch from and integrate with another repository or a local branch
   push      Update remote refs along with associated objects

'git help -a' and 'git help -g' list available subcommands and some
concept guides. See 'git help <command>' or 'git help <concept>'
to read about a specific subcommand or concept.
See 'git help git' for an overview of the system.
Security Best Practices
- Change default SSH port.
- White-list trusted IPs.
- Use Fail2ban with firewalld or iptables.
- Regularly check logs for false positives.
- Always keep system and Fail2ban updated.
Final Notes
Fail2ban is one of the simplest but most effective tools for server hardening. With these step-by-step commands and quick scripts, you’ll always have visibility into who’s being banned and why, while keeping brute-force bots at bay.
What is the purpose of Fail2ban in a Linux system?
Fail2ban is a security tool designed to protect Linux systems from various types of attacks, particularly brute-force attacks. Its main purposes include:
- Intrusion Prevention: Fail2ban monitors log files for specific patterns that indicate failed login attempts. When it detects repeated failures from a single IP address, it can automatically ban that IP for a specified duration, preventing further attempts.
- Protection for Services: It can be configured to protect a variety of services, including SSH, FTP, and web servers (like Apache or Nginx), by monitoring their respective logs for suspicious activity.
- Customizable Banning Rules: Users can customize the criteria for banning IP addresses, including the number of allowed failed attempts, the duration of the ban, and the time window in which the failures are counted.
- Notification: Fail2ban can be configured to send notifications when bans occur, which helps administrators stay informed about potential security threats.
- Integration with Firewalls: It works seamlessly with firewall software (like iptables or UFW) to implement bans, making it an effective layer of defense against unauthorized access.
Overall, Fail2ban enhances the security posture of Linux systems by actively responding to potential threats in real-time.
Wrap-up
🔔 For more tutorials like this, consider subscribing to our blog.
📩 Do you have questions or suggestions? Leave a comment or contact us!
🏷️ Tags: fail2ban, linux security, ssh protection, brute force protection, server hardening, centos security, ubuntu server, debian security, firewall rules, sysadmin
📢 Hashtags: #fail2ban #linux #security #sysadmin #server #firewall #ssh #ubuntu #centos #tutorial
Fail2ban
With Fail2ban properly configured, your server becomes much more resistant to brute-force and bot attacks. By following this step-by-step guide and using the commands provided, you now have the knowledge to install, configure, and maintain Fail2ban like a pro.
❓ Git Bash Help – FAQ
1. What is Git Bash?
Git Bash is a terminal application for Windows that provides a command-line interface with Git commands and Unix-like tools such as ls, cat, and ssh.
2. How do I get help for a Git command?
You can use:
git help <command>
Example:
git help clone
3. How do I check if Git Bash is installed?
Run:
git --version
If installed, it will show the Git version.
4. How do I configure my Git username and email?
Run these commands:
git config --global user.name "Your Name"
git config --global user.email "you@example.com"
5. What is the difference between Git and Git Bash?
- Git: the version control system.
- Git Bash: a terminal that lets you run Git and Linux commands on Windows.
6. How do I clear the Git Bash screen?
Use:
clear
7. How do I exit Git Bash?
Just type:
exit
8. Can I use Linux commands in Git Bash?
Yes, many basic Unix commands like ls, pwd, rm, and cat work in Git Bash.
9. How do I clone a repository in Git Bash?
Use:
git clone <repository-url>
10. How do I see all my saved Git configurations?
Run:
git config --list
