

⏲️ Estimated reading time: 39 min
Table of Contents
Discover five practical ways to clean your car engine bay at home without unnecessary risks. Using a Volvo XC60 as a real-world example, this detailed guide explains safe cleaning products, essential precautions, step-by-step techniques, common mistakes, and how to achieve a professional-looking finish while protecting sensitive components.
Why Cleaning Your Car Engine Bay Matters More Than You Think
Open the hood of a modern vehicle, and you will discover an area that rarely receives the same attention as the exterior paintwork or interior upholstery. The engine bay contains plastic covers, rubber hoses, metal brackets, electrical connectors, and other components that gradually collect dust, road grime, pollen, and environmental contaminants. Although this buildup is often harmless, a carefully maintained engine compartment can make routine inspections easier and give your vehicle a more cared-for appearance.
Many drivers assume that cleaning an engine requires professional equipment, powerful chemicals, or a pressure washer. In reality, a modern engine bay often needs little more than soft brushes, microfiber towels, a suitable cleaner, and a careful approach. The secret is knowing which components can tolerate moisture, which areas require extra protection, and when cleaning should be left to a professional.
This guide explores five practical cleaning methods, from gentle dry dusting to controlled wet cleaning. We will use a Volvo XC60 engine compartment as a real-world visual example, explain how to choose the right products, and show how to avoid unnecessary risks. The objective is not to make the engine look artificially glossy. Instead, we want a clean, natural factory-style appearance without compromising reliability or safety.

A Real Volvo XC60 Engine Bay: Before and After Cleaning
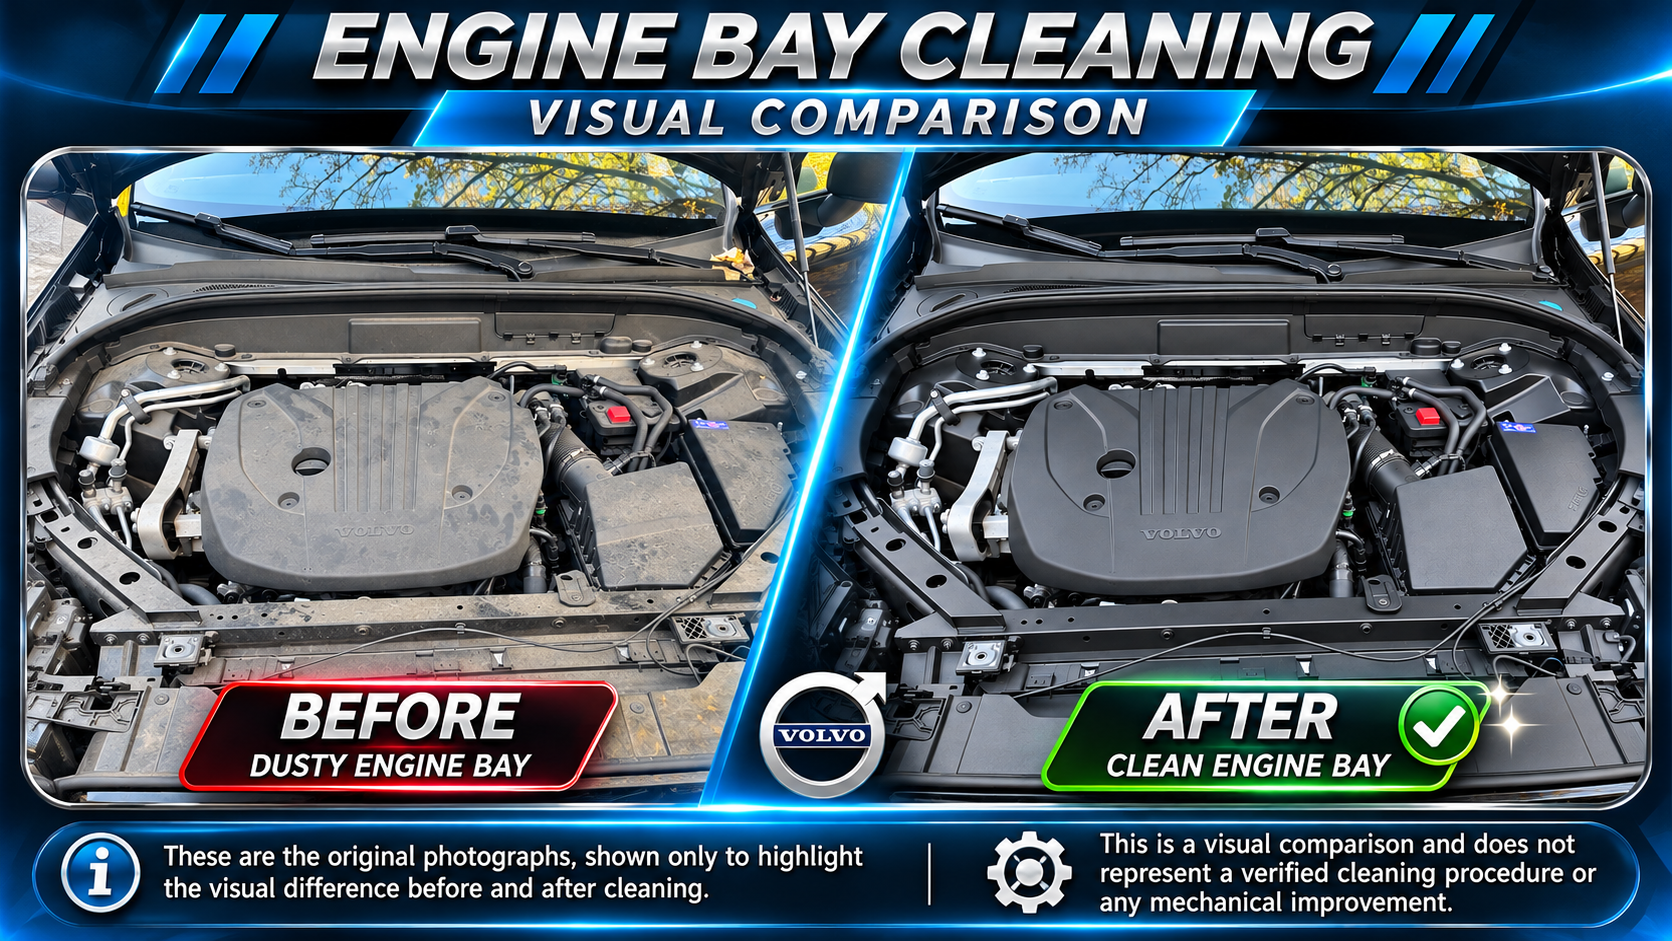
Illustrative dusty engine bay – before cleaning.
The two photographs supplied for this article show the difference between a dusty engine compartment and a clean, well-presented one. In the dusty example, fine particles cover the engine’s plastic trim, surrounding panels, and front radiator support. These deposits are especially noticeable on dark surfaces, where even a thin layer of pale dust creates a tired appearance. In the cleaner image, the black surfaces appear more uniform, the embossed Volvo branding becomes clearer, and the overall compartment looks considerably fresher.
Importantly, a visually clean engine bay does not prove that the engine is mechanically healthier, nor does a dusty engine necessarily indicate poor maintenance. Cleaning is primarily about appearance, inspection visibility, and careful preservation of accessible surfaces. A sensible cleaning routine should never introduce unnecessary water or chemical exposure simply to achieve a showroom finish.
Understanding What Is Under Your Car’s Hood
Before selecting cleaning products, it helps to understand what you are actually cleaning. The large black plastic cover commonly visible in a Volvo XC60 engine bay is an engine cover, sometimes called a decorative engine cover or acoustic cover. It is not the engine block itself. Its purpose can include improving appearance, reducing certain noises, and protecting selected components from incidental dirt. Because it is usually a molded plastic part, it often responds well to gentle cleaning with a damp microfiber towel.
Around the engine cover are other surfaces that require different levels of care. Rubber hoses carry fluids or air, metal lines connect mechanical systems, and plastic housings protect filters or electrical equipment. Some parts are sturdy enough for careful exterior wiping, while others contain sensitive connections that should remain dry. Modern vehicles also have complex electronic control systems, making aggressive cleaning techniques particularly undesirable.
Identify the Components Before You Start
In the Volvo XC60 photographs, several recognizable areas can be identified. The central black cover carries the Volvo logo. To the right are plastic housings associated with the air intake and electrical equipment. A red protective terminal cover is visible toward the rear-right side of the engine compartment. Metal lines and structural supports appear along the sides, while the front section contains trim panels and the hood-latch area.
The red-covered terminal and nearby electrical equipment should not be treated as ordinary decorative plastic. Avoid spraying cleaner into connectors, removing protective covers, or touching electrical terminals with wet tools. Likewise, the air-intake system should remain closed and protected from liquid intrusion. A cleaning job should never require dismantling electrical components or removing safety covers merely to reach hidden dust.
Why Modern Engine Bays Need a Gentler Approach
Older vehicles sometimes had comparatively simple engine compartments, with fewer electronic modules and more exposed mechanical parts. Contemporary vehicles combine sophisticated electronics, sensors, wiring harnesses, and specialized materials. Even when manufacturers design these components to withstand normal road conditions, that does not mean they are intended to receive concentrated water jets or unrestricted chemical spraying during cleaning.
The safest approach is to use the least aggressive technique that achieves the desired result. If a dry brush removes the dust, there is no reason to introduce water. If a lightly dampened microfiber cloth cleans the engine cover, a strong degreaser is unnecessary. This principle reduces chemical exposure, limits accidental moisture intrusion, and makes engine bay detailing more manageable for beginners.
Top 5 Methods to Clean Your Car Engine Bay at Home
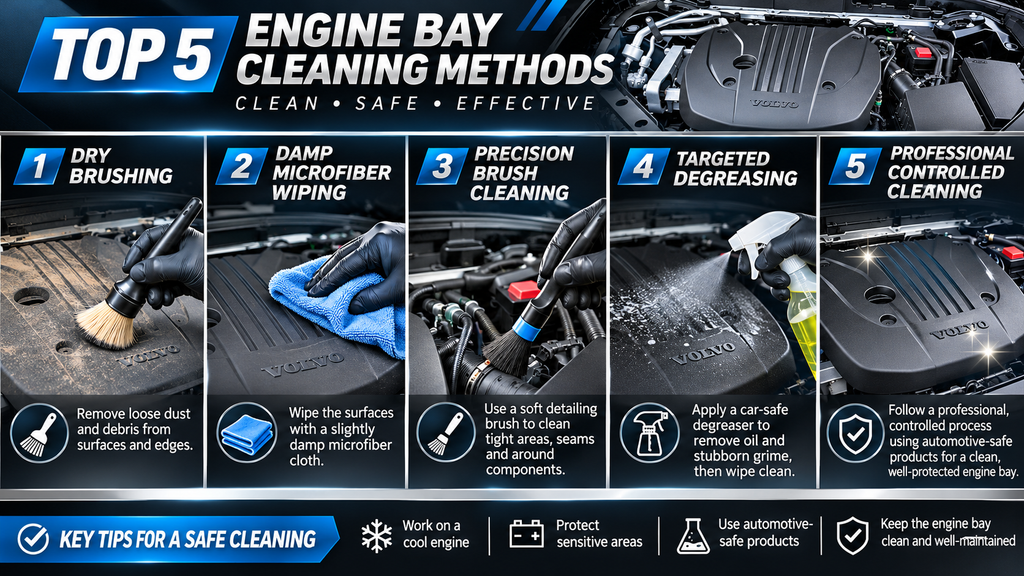
There is no single cleaning method that suits every vehicle or every type of contamination. Light dust, oily deposits, dried mud, and stubborn road film behave differently. The five methods below are arranged from the gentlest everyday approach to more involved cleaning. Each has advantages, limitations, and specific precautions. For most relatively modern cars, especially a Volvo XC60 with mainly dusty plastic covers, the first three methods will usually be sufficient.
Method 1: Dry Cleaning With Soft Brushes and Microfiber Towels
Best for light dust
Low moisture • Beginner-friendly
Dry cleaning is the simplest starting point for an engine compartment that has accumulated ordinary dust but does not contain significant grease or mud. Begin with the vehicle parked safely, the ignition switched off, and the engine completely cool. Open the hood and inspect the visible surfaces. Remove loose leaves by hand from accessible areas, taking care not to push debris into air ducts, drainage openings, or narrow gaps.
Use a clean, soft detailing brush to loosen dust from plastic covers and accessible trim. Work gently around lettering, molded edges, and seams. Follow with a dry microfiber towel, lifting particles rather than grinding them into the surface. Replace or shake out the towel when it becomes dirty. For delicate glossy plastic, avoid aggressive brushing because trapped grit can leave fine scratches.
Dry cleaning is particularly useful for regular maintenance because it avoids introducing water into the engine compartment. However, it cannot reliably remove oily residue, sticky deposits, or deeply embedded road film. When grime remains after a gentle pass, switch to a suitable damp-cleaning method instead of applying greater pressure with a brush.
Method 2: Damp Microfiber Cleaning With a Mild Automotive Cleaner
Best overall choice
Controlled moisture • Everyday grime
For many owners, a lightly dampened microfiber towel offers the best balance between cleaning performance and component protection. Select an automotive cleaner that explicitly lists compatibility with the surface being cleaned, such as unpainted plastic or rubber trim. Read the manufacturer’s instructions before use. A pH-neutral product can be a sensible option for compatible materials, but pH alone does not guarantee safety for every surface or electrical component.
Apply the cleaner to the towel rather than spraying it directly into the engine compartment. This simple habit gives you greater control over where the product goes. Gently wipe the engine cover, accessible plastic housings, and other non-electrical surfaces. Use a separate damp cloth to remove cleaner residue where the product instructions require it, then finish with a dry microfiber towel.
For a dusty Volvo XC60 engine cover, this method is often all that is needed to restore a clean appearance. It avoids unnecessary saturation and gives you time to inspect each area as you work. Keep the cloth only lightly damp, never dripping wet. Avoid wiping exposed electrical contacts, damaged wiring, or hot components, and do not attempt to clean underneath protective covers.
Method 3: Cleaning Tight Spaces With Detailing Brushes
Best for crevices
Precision cleaning • Minimal liquid
Even after wiping the large plastic covers, dust may remain in narrow seams, around raised lettering, and beside accessible brackets. Small automotive detailing brushes can help reach these areas without requiring component removal. Choose brushes with soft, flexible bristles and avoid stiff wire brushes or abrasive household cleaning tools. Different brush sizes make it easier to work around complex shapes without forcing the bristles into sensitive connections.
For dry dust, gently agitate the surface and collect loosened particles with a microfiber towel. If a compatible cleaner is necessary, apply a small quantity to the brush or cloth rather than saturating the area. Work on one section at a time, paying attention to whether the bristles are moving dirt onto neighboring surfaces. A clean finishing towel will help prevent streaks and residue.
This technique works especially well around the molded lines of the Volvo engine cover, the edges of accessible plastic trim, and certain non-electrical brackets. However, a detailing brush should never be pushed into wiring connectors, ventilation openings, exposed terminals, or moving mechanisms. Precision cleaning is valuable only when it remains controlled.
Cleaning tools and techniques
Method 4: Targeted Degreasing for Oily Residue
Extra caution
Localized grime • Product compatibility essential
Occasionally, an engine compartment develops greasy residue that ordinary microfiber cleaning cannot remove. A suitable automotive degreaser may help on compatible, accessible surfaces, but it should never be applied indiscriminately across the entire engine bay. Some formulas can affect coatings, plastics, rubber, adhesives, and sensitive finishes. Always check the product label, dilution requirements, and vehicle manufacturer’s guidance.
Start by identifying the source of the residue. A small amount of old grime on a bracket is different from fresh oil collecting around a seal or fluid connection. If the area appears wet with engine oil, coolant, fuel, or another automotive fluid, arrange a mechanical inspection rather than simply cleaning it away. Removing evidence of an active leak can delay an important repair.
For confirmed surface grime, test the cleaner on a small compatible area. Apply it to a cloth or appropriate applicator, follow the stated dwell time, and remove it according to the product instructions. Avoid allowing liquid to run into connectors, belts, alternators, or inaccessible openings. If the cleaner requires extensive rinsing, it may not be appropriate for a beginner’s low-moisture engine bay cleaning routine.
Method 5: Controlled Wet Cleaning or Professional Engine Bay Detailing
Higher risk
Heavy contamination • Manufacturer guidance required
Some heavily contaminated engine compartments may require more extensive cleaning than towels and brushes can provide. Professional detailers may use specialized equipment, carefully controlled moisture, and products selected for specific materials. However, the existence of these techniques does not mean every modern vehicle can safely tolerate the same process. Cleaning procedures should always follow the vehicle manufacturer’s instructions.
For home maintenance, avoid directing a pressure washer, garden hose jet, or steam-cleaning nozzle into the engine compartment unless the manufacturer explicitly approves the method and specifies how it should be performed. Concentrated water and heat can create risks around electrical connectors, seals, insulation, and other sensitive components. Simply covering one electrical box with plastic does not make unrestricted washing safe.
If the engine bay contains heavy mud, significant oil contamination, or dirt in areas that cannot be reached without dismantling components, professional assistance is often the more sensible choice. A qualified technician or experienced detailer can assess the contamination and determine which parts require special handling. For a vehicle with ordinary surface dust, such an intensive procedure is usually unnecessary.
Comparing the Five Engine Bay Cleaning Methods
Each method offers a different balance of convenience, cleaning power, and risk. The table below provides a practical comparison for typical passenger vehicles. These ratings are general guidance rather than manufacturer-certified safety classifications, and the actual suitability of a method depends on the vehicle, the products used, and the condition of the components.
| Cleaning method | Best application | Relative moisture exposure | DIY suitability |
|---|---|---|---|
| Dry microfiber and brush | Loose dust | Very low | Excellent |
| Damp microfiber | Light road grime | Low | Excellent |
| Precision detailing brushes | Tight spaces | Low if used dry | Good |
| Targeted degreaser | Greasy deposits | Varies | Moderate |
| Controlled wet detailing | Heavy contamination | Higher | Professional preferred |
For the dusty Volvo XC60 shown in the example photographs, dry dust removal followed by damp microfiber cleaning and careful detailing around the engine cover would be a sensible starting combination. This approach focuses on the areas that most influence appearance without introducing unnecessary water. It also allows the owner to stop as soon as the compartment looks clean enough, rather than pursuing perfection in difficult-to-reach locations.
Essential Tools and Products for DIY Engine Bay Cleaning
Choosing the right equipment can make engine bay cleaning considerably easier. You do not need an expensive professional detailing kit, especially when the compartment is only dusty. In fact, buying too many products can complicate a straightforward job. A small collection of reliable, surface-compatible tools will usually deliver better results than several aggressive chemicals. The goal is to remove contamination while preserving the original appearance of plastic, rubber, painted metal, and other accessible materials.
Before purchasing anything, check whether you already own suitable microfiber towels and a gentle automotive cleaner. Keep engine bay cleaning towels separate from those used on exterior paint or interior screens. Grease, sand, and road debris can remain trapped in the fibers even after a quick rinse. Dedicated towels help prevent cross-contamination and reduce the likelihood of scratching delicate finishes.
Microfiber Towels: The Most Important Cleaning Tool
A good microfiber towel should feel soft, absorb moisture effectively, and release loose dust without requiring excessive pressure. For engine bay cleaning, medium-pile automotive microfiber towels are often more practical than very thick polishing towels. They can reach around the contours of plastic covers while remaining easy to fold and control. Avoid old household rags containing rough stitching, hardened dirt, or fabric-softener residue.
Use several towels during a complete cleaning session. One can collect dry dust, another can apply a mild cleaner, and a third can remove residue and finish the surface. This separation keeps dirty particles from spreading across freshly cleaned components. Wash the towels according to their care instructions, without products that reduce absorbency. Never reuse a towel contaminated with oil or solvent on paintwork or delicate interior surfaces.
Soft Automotive Detailing Brushes
A detailing brush helps clean textured plastics, molded lettering, and narrow edges that are difficult to reach with a folded cloth. Choose a brush designed for automotive use, preferably with soft synthetic bristles and a handle that offers good control. Small brushes work around details, while wider brushes cover larger areas more efficiently. The bristles should bend easily rather than scrape the surface.
Inspect the brush before each use. If it contains sand or hardened dirt from a previous cleaning session, wash and dry it first. Avoid using the same brush for wheels, brake dust, and engine bay plastics. Wheel-cleaning brushes may carry abrasive particles or chemical residue that can damage other materials. For a Volvo engine cover, a clean, soft brush is generally sufficient for the recessed lettering and decorative lines.
Mild Automotive All-Purpose Cleaner
An automotive all-purpose cleaner, commonly abbreviated as APC, can be useful for removing ordinary grime from compatible surfaces. However, not every APC is suitable for engine compartments, and some concentrated products require significant dilution. Always follow the manufacturer’s recommended dilution ratio, contact time, and removal instructions. Never assume that a product is harmless because its packaging describes it as environmentally friendly or biodegradable.
For light dust, a cloth dampened with water may be enough. If additional cleaning power is required, choose a product that explicitly supports the material being cleaned. Test it on an inconspicuous area and avoid allowing residue to dry on the surface. Do not mix different cleaners or combine degreasers with household chemicals. A predictable, simple cleaning routine is usually safer than experimenting with homemade chemical mixtures.
Plastic and Rubber Dressing: Optional, Not Essential
Some automotive detailing products are designed to restore the visual appearance of exterior plastics and rubber. They may create a darker finish, reduce the appearance of fading, or leave a protective coating. However, these products are optional during engine bay cleaning. A clean factory-style surface is often preferable to an excessively glossy finish, particularly on modern vehicles with large black plastic engine covers.
If you choose to use a dressing, select one specifically approved for the intended automotive surface and suitable for the temperatures and conditions of the application. Apply it sparingly to a cloth, following the manufacturer’s directions. Keep it away from belts, pulleys, electrical contacts, intake openings, hot exhaust components, and areas where a slippery residue could cause problems. Never apply tire shine indiscriminately throughout an engine compartment.
Additional Equipment Worth Having
A small inspection flashlight makes it easier to identify dust, leaves, damaged hoses, and suspicious fluid deposits. Nitrile gloves can protect your hands from dirt and compatible cleaning products, although gloves do not make unsafe chemicals harmless. A clean container for used towels also helps prevent dirty cloths from touching painted bodywork. These simple accessories make the process more organized without introducing additional mechanical risks.
You may also find a soft, narrow cleaning brush useful for accessible seams. Avoid using compressed air near electrical connectors, loose debris, or delicate components. High-pressure air can force dirt into openings or dislodge parts. If you need to remove leaves from the windshield cowl area, collect them by hand where safely accessible. Do not push debris toward the ventilation intake or drainage channels.
Step-by-Step Guide: How to Clean a Volvo XC60 Engine Bay
The Volvo XC60 provides a useful example because its engine compartment contains large plastic surfaces that visibly collect dust. The following procedure focuses on accessible cosmetic cleaning rather than mechanical servicing. It is not a substitute for Volvo’s model-specific instructions, and it does not authorize washing electrical components or removing engine covers. Before beginning, consult the owner’s manual for your exact model year and powertrain.
A careful cleaning session does not need to be rushed. Allow enough time to inspect the compartment, prepare clean tools, and work systematically. If you notice damaged wiring, loose connections, unusual fluid deposits, or signs of overheating, stop and arrange an appropriate inspection. Cosmetic cleaning should never take priority over a potential mechanical or electrical problem.
Step 1: Park Safely and Allow the Engine to Cool
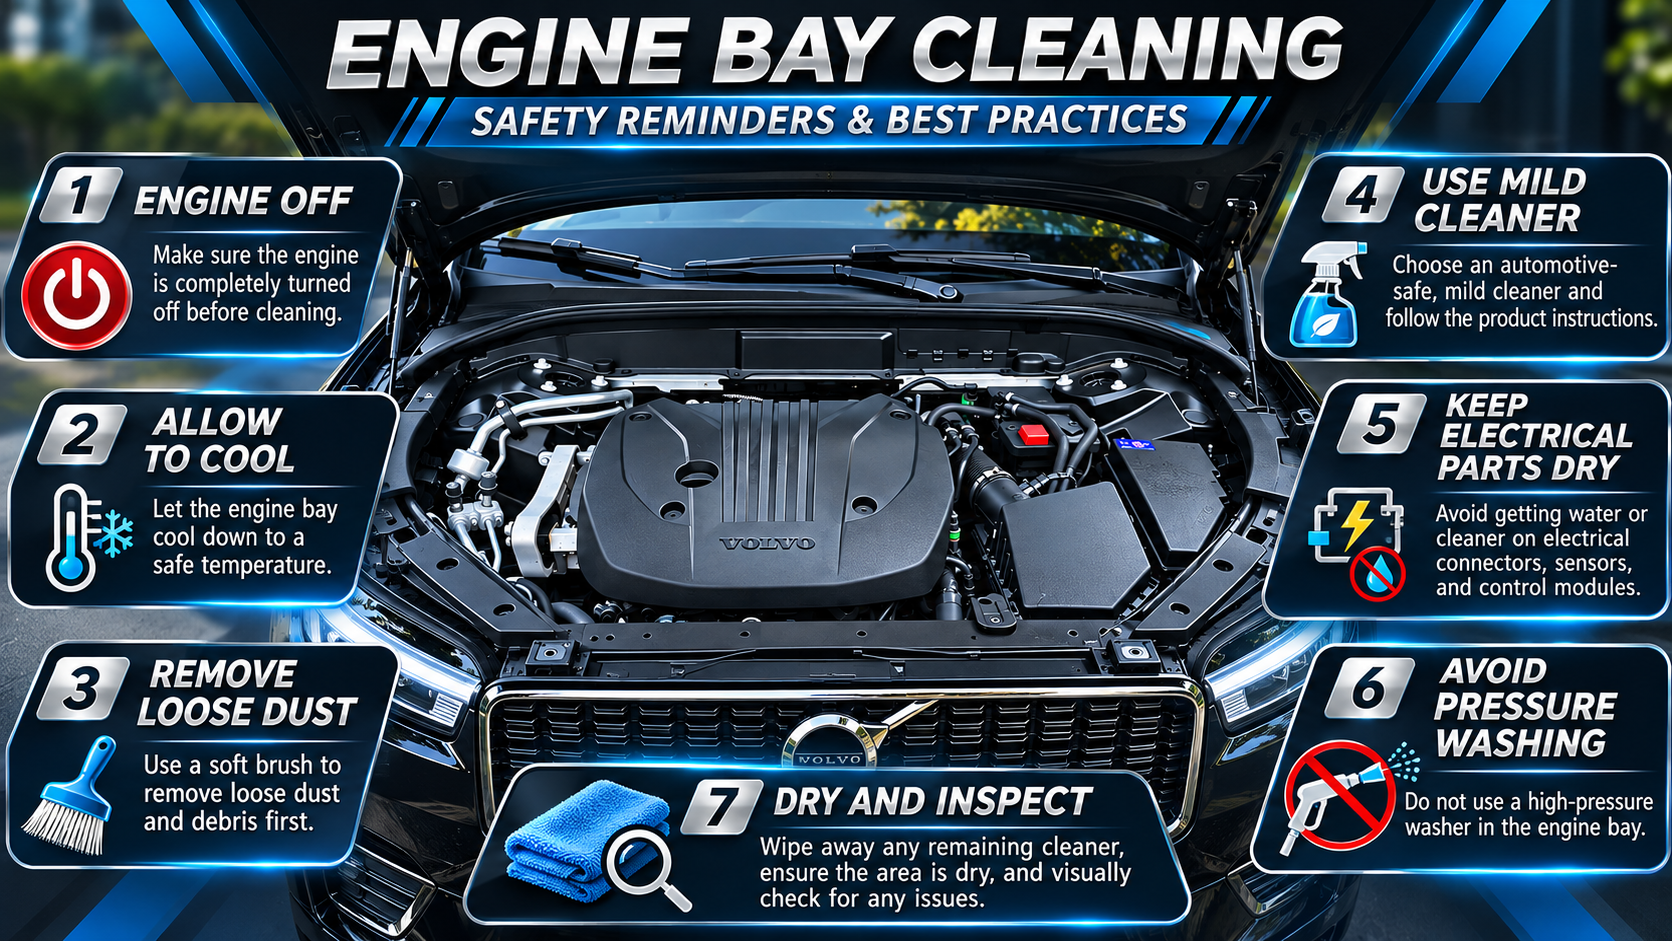
Choose a level, well-ventilated parking area with adequate lighting. Switch off the vehicle, secure it against movement, and keep the key away from the engine compartment. Allow the engine to cool completely before touching nearby components. Certain parts may remain hot long after driving, and some modern vehicles can activate cooling fans automatically under particular conditions.
Never place your hands near a fan, belt, pulley, or other moving component. Avoid cleaning while the vehicle is running or while a charging or maintenance procedure is taking place. For vehicles with hybrid or electrified systems, additional precautions may apply. Do not touch high-voltage cables or components, which are commonly identified by orange markings, and follow the manufacturer’s specific safety guidance.
Step 2: Inspect the Engine Bay Before Cleaning
Open the hood and visually inspect the accessible compartment. Look for loose leaves, accumulated dust, visible fluid deposits, damaged plastic, and unusual discoloration. Pay particular attention to the areas around the engine cover, air-filter housing, visible hoses, and front trim panels. A flashlight can help reveal dirt that is difficult to see in shadowed areas.
If you discover wet oil, coolant residue, fuel odors, damaged insulation, or loose electrical connectors, do not attempt to disguise the problem with cleaning products. Photograph the affected area and seek professional advice. Similarly, if you find evidence of animal nesting or chewed wiring, avoid disturbing damaged components. Cleaning should begin only after you are reasonably confident that no obvious issue requires immediate attention.
Step 3: Remove Loose Leaves and Surface Debris
Begin by collecting loose leaves and other visible debris from accessible, non-moving areas. The space near the windshield can collect seasonal leaves, particularly when a vehicle is parked outdoors beneath trees. Remove them carefully without pushing material into drainage channels or ventilation openings. Do not remove fixed trim panels simply to reach debris unless the manufacturer’s procedure explicitly permits it.
Next, use a soft brush to loosen dust from the large engine cover and surrounding plastic trim. Work from relatively clean upper surfaces toward dirtier lower areas. Collect the loosened particles with a dry microfiber towel. This initial stage is important because wiping a dusty surface with a wet cloth can create muddy streaks and increase the risk of dragging abrasive particles across plastic.
Step 4: Clean the Large Plastic Engine Cover
The central Volvo-branded engine cover is the most visually prominent part of the compartment in the supplied photographs. Begin with a clean microfiber cloth lightly dampened with water or a suitable automotive plastic cleaner. Wipe the cover in small sections, using gentle pressure. Fold the towel frequently so that each pass uses a clean surface.
For the recessed Volvo lettering and decorative grooves, use a soft detailing brush if necessary. Do not force liquid into openings or gaps. Follow with a clean, dry towel to remove remaining moisture and cleaner residue. A uniform matte or satin finish usually looks more natural than a thick layer of glossy dressing. If the plastic remains slightly faded after cleaning, remember that cleaning alone cannot reverse every form of material aging.
Step 5: Clean Accessible Surrounding Plastic Panels
Once the engine cover looks clean, move to the surrounding plastic housings and trim. These may include accessible portions of the air-filter housing, radiator support covers, and other decorative panels. Apply a small amount of suitable cleaner to the microfiber towel, never directly into seams or openings. Wipe one surface at a time, paying attention to edges where dust tends to collect.
Do not open the air-filter housing or disturb its connections for cosmetic cleaning. Likewise, avoid removing electrical covers or touching the red terminal cover visible in the Volvo example. A lightly dampened towel can clean accessible exterior plastic where safe, but electrical assemblies and their connections should remain undisturbed. The objective is to improve the appearance of exposed surfaces, not to clean every hidden component.
Step 6: Carefully Address Metal Brackets and Accessible Edges
Metal brackets and structural supports may collect a different type of dirt than smooth plastic covers. Dust can settle around bolts, stamped edges, and painted metal surfaces. Use a dry microfiber towel or soft brush to remove loose particles. If necessary, follow with a lightly dampened cloth and a cleaner compatible with the specific finish.
Avoid scraping corrosion, loosening bolts, or applying chemical treatments without understanding the component. Some metal parts have protective coatings that can be damaged by abrasive cleaning. If you notice significant rust, damaged fasteners, or unusual staining, consider a professional inspection. Engine bay detailing is not the appropriate time to experiment with mechanical adjustments or corrosion treatments.
Step 7: Inspect Rubber Hoses Without Disturbing Them
Visible rubber hoses can accumulate dust, but they do not need to be coated with dressing to remain functional. If a hose is accessible and cool, gently remove loose dust with a clean cloth. Avoid pulling, twisting, squeezing, or disconnecting hoses. Do not use aggressive solvents, petroleum-based cleaners, or unapproved treatments that could affect rubber or nearby fittings.
While cleaning, you may notice cracking, swelling, staining, or unusual residue. These observations can be useful, but visual appearance alone does not establish whether a hose is safe. A qualified technician should assess suspected deterioration. Never attempt to open a coolant system while hot, and do not loosen clamps or fluid connections during a cosmetic cleaning session.
Step 8: Finish With a Dry Microfiber Towel
After cleaning the accessible surfaces, use a fresh, dry microfiber towel to remove remaining moisture and visible residue. Pay attention to flat plastic panels, where cleaner streaks are especially noticeable. Inspect the engine cover from different angles under natural light. If a section still looks dusty, repeat the gentle wiping process rather than applying increasingly aggressive products.
Check that no towels, brushes, bottles, or loose materials remain in the engine compartment. Ensure that nothing has been placed near moving components or the hood-latch mechanism. Do not leave protective coverings, loose plastic bags, or cleaning cloths under the hood. Close the hood according to the manufacturer’s instructions, confirming that it latches securely.
Step 9: Review the Final Result
A successful cleaning session should leave the accessible surfaces looking cleaner without introducing new problems. The plastic engine cover should appear more uniform, visible dust should be reduced, and surrounding trim should be free of obvious cleaner residue. There is no need to make every hidden surface spotless. Excessive cleaning can create more risk than the original dust ever presented.
For future reference, take a photograph of the finished compartment. Comparing photographs taken under similar lighting conditions can help you monitor dust accumulation and identify new stains. If you later notice a fresh fluid deposit, the cleaner background may make it easier to spot. However, always treat suspected leaks or mechanical issues as maintenance concerns rather than detailing problems.
Common Engine Bay Cleaning Mistakes to Avoid
The biggest mistake is assuming that an engine compartment can be cleaned exactly like the exterior bodywork. Automotive paint, exterior glass, and wheels are designed for different cleaning conditions than exposed engine bay components. A pressure washer that is appropriate for certain exterior surfaces may be unsuitable around electrical equipment and seals. The cleaning method must match the materials and risks present in the area.
Another common mistake is applying too much product. Strong degreasers, glossy dressings, and concentrated cleaners may look impressive in online detailing videos, but they are rarely necessary for light dust. More chemical exposure does not automatically mean better cleaning. In many situations, it simply increases the amount of residue that must be removed and the chance of contacting an incompatible material.
Mistake 1: Using a High-Pressure Water Jet
High-pressure water can force moisture past seals or into openings that would not normally receive a concentrated spray. Electrical connectors, control modules, intake components, and other assemblies may be vulnerable depending on their design and condition. Even when a vehicle operates normally immediately afterward, moisture-related problems can be difficult to diagnose.
For routine home cleaning, avoid pressure washing the engine bay. If a vehicle has heavy contamination that genuinely requires wet cleaning, consult the manufacturer or a qualified professional. Do not rely on generic internet advice that treats all engines as equally resistant to water. Vehicle-specific design matters.
Mistake 2: Cleaning a Hot Engine
Cleaning products can evaporate rapidly on hot surfaces, potentially leaving concentrated residue or causing staining. More importantly, hot components can cause burns, and sudden temperature changes may create additional risks for certain materials. The engine, exhaust-related parts, and cooling system may remain hot even when the vehicle has been parked for some time.
Wait until the compartment is completely cool before beginning. Do not test component temperatures by touching unfamiliar metal parts. If you have recently completed a long journey, postpone the cleaning session rather than rushing it. A cool engine bay is easier and more comfortable to work around.
Mistake 3: Spraying Cleaner Directly Onto Electrical Components
Aerosol sprays and liquid cleaners can spread beyond the intended surface. Even when the nozzle appears precise, droplets may reach connectors, wiring, sensors, or inaccessible gaps. Some products leave conductive, corrosive, or sticky residues depending on their composition. This makes direct spraying an unnecessary risk for simple cosmetic cleaning.
Apply compatible cleaner to a cloth whenever practical. Keep the cloth lightly damp and control the cleaning area. Never open electrical housings or remove protective terminal covers to improve their appearance. If an electrical assembly requires cleaning because of contamination or corrosion, seek appropriate technical guidance.
Mistake 4: Using Household Detergents Without Checking Compatibility
Dishwashing liquid, kitchen degreasers, bleach, and other household cleaners are not automatically suitable for automotive engine compartments. Their ingredients, concentrations, and residue characteristics vary considerably. Some can affect protective coatings, rubber, painted surfaces, or plastics. Mixing household products can also produce dangerous chemical reactions.
Use products intended for the relevant automotive materials, and follow their labels carefully. Avoid improvising mixtures from internet recipes. A product that works well on kitchen grease may be inappropriate near automotive wiring or coated metal. When uncertain, plain water on a lightly dampened cloth is often a more conservative option for compatible decorative plastic.
Mistake 5: Applying Shiny Dressing Everywhere
A heavily dressed engine compartment can appear impressive in photographs, but glossy residue is not always desirable. Excess product may attract dust, transfer onto nearby components, or create slippery surfaces. Some dressings are not designed for high-temperature environments or for contact with particular types of rubber and plastic.
If you want a factory-style finish, prioritize cleanliness over shine. Use dressing only where the product manufacturer explicitly approves its application. Never coat belts, pulleys, electrical contacts, braking components, or hot exhaust-related parts. A clean matte finish can look professional without additional treatment.
Mistake 6: Ignoring the Source of Grease or Fluid Deposits
Fresh oil or coolant residue is not simply another type of dirt. It may indicate a leak or another issue requiring diagnosis. Cleaning the area before documenting the problem can remove useful evidence and make the source harder to identify. Repeatedly washing away a leak does nothing to resolve the underlying cause.
If you notice suspicious fluid deposits, photograph them and arrange a mechanical assessment. Do not taste, touch, or smell unknown fluids directly. Keep children and pets away from automotive chemicals and leaks. Proper maintenance should always come before cosmetic presentation.
How Often Should You Clean Your Car Engine Bay?
There is no universal cleaning schedule for engine compartments. A vehicle driven mainly on paved city roads may accumulate dust slowly, while one frequently exposed to construction sites, muddy roads, or seasonal road salt may become dirty much faster. Parking beneath trees can also increase the amount of leaves and organic debris near the windshield. Rather than following a rigid schedule, inspect the compartment periodically and clean accessible surfaces when necessary.
For many privately owned vehicles, a light cosmetic cleaning every three to six months may be sufficient. A more thorough visual inspection can coincide with regular maintenance, seasonal tire changes, or longer road trips. This is only a suggested detailing interval, not a Volvo service requirement. If the compartment remains clean, there is little benefit in repeating the process unnecessarily.
Spring Engine Bay Cleaning
Spring is a convenient time to inspect accumulated winter dirt, especially in regions where roads are treated with salt or de-icing products. These substances can contribute to corrosion on susceptible materials. However, engine bay cleaning alone is not a substitute for appropriate underbody care or corrosion inspection. If road salt has reached inaccessible areas, professional advice may be necessary.
Begin by removing loose debris and checking accessible surfaces for unusual deposits. Use gentle cleaning techniques on compatible plastic and painted components. Avoid attempting to flush hidden areas with water, as this can move contamination into electrical or mechanical assemblies. The aim is to remove visible dirt without disturbing the vehicle’s protective systems.
Summer Engine Bay Cleaning
During warmer months, dry dust and pollen may become more noticeable on dark plastic surfaces. Vehicles parked outdoors can collect fine particles even when they are not driven frequently. A dry microfiber towel and soft detailing brush will often be enough to restore a cleaner appearance. Avoid cleaning immediately after driving, particularly when ambient temperatures are high.
Summer is also a good time to inspect accessible areas for leaves, insects, and other debris. Be careful around the cooling fan and radiator-related components. Never insert brushes or fingers into fan openings. If airflow appears restricted by significant debris, consult a technician rather than attempting to dismantle components yourself.
Autumn and Winter Engine Bay Maintenance
Autumn leaves can collect near the windshield cowl and hood edges. Removing them from safely accessible areas may help prevent debris accumulation. During winter, road grime and moisture can make exterior cleaning more challenging, but this does not mean the engine bay requires frequent washing. In many cases, a visual inspection and limited dry cleaning are sufficient.
If you live in a region with cold winters, avoid introducing unnecessary water into the compartment shortly before freezing conditions. Moisture trapped in unsuitable locations can create complications. Wait for favorable temperatures and follow the manufacturer’s guidance. For a modern Volvo XC60, controlled, low-moisture cosmetic cleaning remains a sensible approach throughout the year.
Can Engine Bay Cleaning Improve Vehicle Performance?
A clean engine bay may look better and make certain inspections easier, but it does not normally increase horsepower, improve fuel economy, or make a healthy engine run more efficiently. The decorative plastic engine cover does not need to be spotless for the engine to operate correctly. Claims that ordinary engine bay detailing automatically improves performance should therefore be treated with skepticism.
There are situations where excessive contamination requires attention. Heavy debris blocking an appropriate cooling-air path, for example, can be a maintenance concern. However, resolving such problems requires identifying the affected system and following the correct service procedure. Simply wiping dust from the engine cover does not repair cooling faults, improve combustion, or restore lost mechanical performance.
Does Cleaning Help Detect Problems Earlier?
A cleaner compartment can make some visible changes easier to notice. Fresh fluid deposits, damaged insulation, unusual staining, or deteriorating hoses may stand out more clearly against clean surrounding surfaces. This is a practical advantage, particularly for owners who inspect their vehicles regularly. Nevertheless, visual checks cannot replace scheduled servicing or professional diagnostics.
Some mechanical faults produce no visible signs under the hood, while harmless dust patterns may appear alarming to an inexperienced owner. Use cleaning as an opportunity to observe the vehicle, not as a substitute for maintenance. If anything seems unusual, record what you see and ask a qualified technician to investigate.
Can Engine Bay Cleaning Increase Resale Value?
A clean engine compartment can contribute to a positive first impression when presenting a used vehicle. Potential buyers often appreciate signs that a car has received careful attention. However, cleanliness alone does not establish mechanical condition, service history, or market value. A spotless engine bay cannot compensate for missing maintenance records or unresolved faults.
For resale preparation, prioritize documented servicing, honest condition reporting, and appropriate cosmetic cleaning. Avoid using heavy dressings or aggressive washing to conceal stains or leaks. Transparent presentation builds more confidence than an artificially glossy engine compartment. Buyers should still arrange an independent inspection when appropriate.
DIY Engine Bay Cleaning vs. Professional Detailing
Cleaning your own engine compartment can be satisfying, especially when the contamination consists mainly of ordinary dust. You can control the products, work slowly, and avoid unnecessary disassembly. It also gives you an opportunity to become familiar with the visible layout of your vehicle. For simple surface cleaning, professional equipment is rarely essential.
Professional detailing becomes more attractive when contamination is extensive, difficult to identify, or located around components that require special precautions. An experienced detailer should understand material compatibility, moisture control, and the limits of cosmetic cleaning. However, not every detailing business follows the same procedures, so it is worth asking how they protect sensitive components before booking.
When DIY Cleaning Makes Sense
DIY cleaning is a reasonable option when the engine is cool, the accessible surfaces are intact, and the dirt consists mainly of loose dust or light road film. You should be able to complete the task without removing covers, disconnecting wiring, or using concentrated water. If a soft brush and damp microfiber towel are sufficient, the work is relatively straightforward.
For the Volvo XC60 example, the visible contamination in the dusty photograph appears largely consistent with surface dust and dirt on plastic trim. A low-moisture cleaning routine would be a logical first approach. The photograph alone cannot establish the condition of hidden components or identify every stain, so any suspicious residue should be assessed separately.
When Professional Cleaning Is Preferable
Professional assistance is advisable when the compartment contains heavy grease, suspected fluid leaks, extensive mud, or contamination near sensitive electrical equipment. It may also be appropriate after certain mechanical repairs or when the manufacturer’s instructions require specialized procedures. In these situations, the risk of causing damage can outweigh the savings from attempting an unfamiliar cleaning technique.
Before authorizing professional work, ask whether the provider uses pressure washing, steam, chemical degreasers, or manual cleaning. Explain the vehicle’s model year and powertrain, and request a method compatible with the manufacturer’s recommendations. A responsible professional should be willing to discuss the process and its limitations.
Environmental Responsibility When Cleaning an Engine Bay
Automotive cleaning products and oily residue should be handled responsibly. Even a small cleaning session can generate contaminated towels, dirty water, or chemical waste. Avoid allowing degreasers, oil, or other residues to enter storm drains, soil, or natural waterways. Local environmental rules may govern where vehicle washing is permitted and how contaminated waste must be disposed of.
For light engine bay dust, low-moisture cleaning has an additional advantage: it produces little or no wastewater. Reusable microfiber towels can also reduce reliance on disposable wipes, provided they are washed and handled appropriately. Towels heavily contaminated with oil, fuel, or hazardous chemicals may require special disposal rather than ordinary laundering.
Choosing Products With Less Environmental Impact
Look for clear product instructions, appropriate material compatibility, and transparent information about ingredients and disposal. A biodegradable claim does not automatically mean that a product can safely enter a storm drain or be used without precautions. Concentration, toxicity, and the type of contamination being removed all matter.
Use only the amount of cleaner needed for the job. Avoid applying products repeatedly when a damp towel would achieve the same result. If you are unsure how to dispose of contaminated materials, consult your municipality’s waste-management guidance. Responsible detailing protects both the vehicle and the surrounding environment.
Frequently Asked Questions – Engine Bay Cleaning
1. Is It Safe to Clean a Car Engine Bay Yourself?
Yes, light cosmetic cleaning can be performed by many vehicle owners when they follow the manufacturer’s precautions. Dry microfiber towels, soft brushes, and carefully controlled damp cleaning are generally more conservative approaches than aggressive washing. Always work with the engine switched off and completely cool. Avoid electrical connections, moving parts, and components that require specialized handling. If the compartment contains significant grease, damaged wiring, or suspicious fluid deposits, professional assistance is preferable.
2. Can I Use a Pressure Washer to Clean My Engine?
Pressure washing is not recommended as a general DIY method for modern engine compartments. Concentrated water can reach sensitive electrical connections, seals, and openings. Some manufacturers may permit specific cleaning procedures, but these should not be assumed to apply to every vehicle. For ordinary dust and light grime, use microfiber towels and soft brushes instead. Consult your exact vehicle’s documentation before considering any wet-cleaning technique.
3. What Is the Best Cleaner for a Volvo XC60 Engine Bay?
For light dirt on compatible plastic trim, a microfiber towel lightly dampened with water may be sufficient. If additional cleaning is necessary, choose a mild automotive cleaner explicitly suitable for the relevant material. Apply it to the towel rather than spraying directly into the compartment. Follow the product label and Volvo’s model-specific guidance. Avoid aggressive degreasers unless there is a specific, appropriate reason to use them.
4. Can Water Damage the Electronics Under the Hood?
Water can cause problems when it reaches components or connections that are not intended to be exposed to the particular cleaning conditions. Modern vehicles are designed to operate in rain and other environmental conditions, but this does not mean every electrical component can tolerate direct spraying or prolonged saturation. Keeping moisture controlled and away from sensitive areas reduces unnecessary risk. Never deliberately wash exposed electrical terminals or connectors.
5. Should I Remove the Plastic Engine Cover Before Cleaning?
Not for routine cosmetic cleaning. The visible surface of the engine cover can usually be cleaned without removing it. Taking off the cover may expose additional components and, depending on the design, may require specific handling instructions. Do not pull, pry, or loosen parts simply to reach hidden dust. If removal is required for maintenance, follow the official service procedure or consult a qualified technician.
6. Can I Use Dish Soap to Clean My Engine Bay?
Dish soap is not the preferred default because household formulations vary and may not be tested for automotive engine bay materials. Some products can leave residue or affect particular finishes. A cleaner designed for compatible automotive plastic or trim is generally a more appropriate choice. For light dust, plain water on a slightly damp microfiber towel may be sufficient. Never mix household detergents with automotive chemicals.
7. How Long Does Engine Bay Cleaning Take?
A simple surface cleaning session may take approximately 20 to 45 minutes once the engine has cooled, depending on the vehicle and the amount of dirt. More extensive detailing can take considerably longer. These are practical estimates, not guaranteed times. Work carefully rather than rushing. If the compartment is heavily contaminated or requires component removal, the job may be better handled by a professional.
8. Does Cleaning the Engine Bay Improve Fuel Economy?
Ordinary cosmetic cleaning does not directly improve fuel economy. Removing dust from the plastic engine cover does not change combustion efficiency or engine calibration. Fuel consumption depends on many factors, including vehicle condition, driving habits, tire pressure, road conditions, and maintenance. Cleaning can make some visible problems easier to notice, but it should not be promoted as a fuel-saving treatment.
9. How Often Should I Clean My Engine Bay?
For a typical road vehicle, inspecting the compartment periodically and cleaning visible dust when needed is usually sufficient. A light cleaning every three to six months may be convenient for some owners, but this is not a mandatory maintenance interval. Driving conditions, seasonal debris, and storage environment all influence how quickly dirt accumulates. Avoid unnecessary repeated chemical cleaning.
10. Is Professional Engine Bay Detailing Worth the Money?
Professional detailing may be worthwhile when the compartment contains heavy contamination or requires techniques beyond simple manual cleaning. It can also be convenient for owners who prefer not to work around engine components. However, an ordinary dusty engine cover rarely requires an intensive professional treatment. Choose a provider who understands modern vehicle electronics and follows manufacturer-compatible procedures.
A Cleaner Engine Bay Starts With Simpler Habits
A clean engine compartment can make a vehicle feel better maintained and more pleasant to inspect. As the Volvo XC60 before-and-after photographs illustrate, removing ordinary dust from dark plastic surfaces can produce a striking visual improvement. Achieving that result does not necessarily require powerful chemicals, pressure washing, or specialized machinery. In many cases, careful manual cleaning provides the appearance owners want while limiting unnecessary exposure to moisture.
The five methods covered in this guide serve different purposes. Dry microfiber cleaning is ideal for loose dust, while lightly dampened towels handle everyday grime. Soft detailing brushes help reach narrow edges, and targeted degreasing can address compatible surfaces affected by oily deposits. More intensive wet cleaning should be approached cautiously and, when appropriate, entrusted to experienced professionals who understand the vehicle’s requirements.
The most important principle is simple: use the gentlest effective method, protect sensitive components, and stop when the accessible surfaces are clean. A spotless engine bay is not worth an electrical fault, damaged finish, or avoidable repair. Treat cleaning as a small part of responsible vehicle care, alongside regular servicing, inspections, and attention to any unusual mechanical symptoms.
⚠️ Disclaimer and Source Hygiene
This article provides general educational information about cosmetic engine bay cleaning. It is not an official Volvo maintenance procedure, mechanical diagnosis, or guarantee that a particular product or technique is safe for every vehicle. Engine compartments vary by model year, engine type, electrical architecture, and component condition. Always consult the vehicle manufacturer’s current instructions and the cleaning product’s safety documentation before proceeding.
The supplied Volvo XC60 photographs are used to illustrate visible cosmetic differences. They do not independently verify which cleaning products or procedures were used. Recommendations in this article are based on conservative automotive care principles, including controlled moisture, material compatibility, and avoidance of unnecessary contact with sensitive components. For suspected leaks, electrical problems, or heavy contamination, consult a qualified automotive technician.
Sources and References
The following primary references are useful for verifying vehicle-specific maintenance requirements, cleaning product compatibility, and general safety guidance. They are provided as further reading; they do not establish that Volvo approves every technique discussed above.
Official Manufacturer and Safety Resources
- Volvo Cars Support – Official owner support and access to model-specific vehicle information.
- Volvo Cars – Manufacturer information, vehicle documentation, and support resources.
- United States Environmental Protection Agency – Environmental guidance and information about chemicals, waste, and water protection.
- European Chemicals Agency – European information about chemical safety, classification, and responsible handling.
- Autoglym – Automotive cleaning product information and application guidance.
- Meguiar’s – Automotive surface-care product information and instructions.
Secondary Sources and Testimonials
Automotive detailing tutorials, product demonstrations, and owner experiences can provide useful practical context, especially when comparing cleaning tools and finishes. However, individual testimonials do not establish universal safety or product compatibility. Techniques demonstrated on older vehicles may be inappropriate for modern engine compartments with different electrical systems.
The Volvo XC60 photographs supplied for this article are original visual examples from the user. They demonstrate the appearance of a dusty compartment and a cleaner presentation, but no specific product, professional service, or cleaning procedure has been independently verified from the images alone. Readers should prioritize current manufacturer instructions and relevant product safety documentation over unverified social media demonstrations.
