⏲️ Estimated reading time: 5 min
🌦️ Weather Dashboard Widget for WordPress: Complete Setup Guide. Easily display current weather conditions in your WordPress dashboard with a lightweight custom plugin. This tutorial walks you through building and activating a plugin that fetches weather data from OpenWeatherMap and shows it in the admin panel.
🧩 What Is the Weather Dashboard Widget?
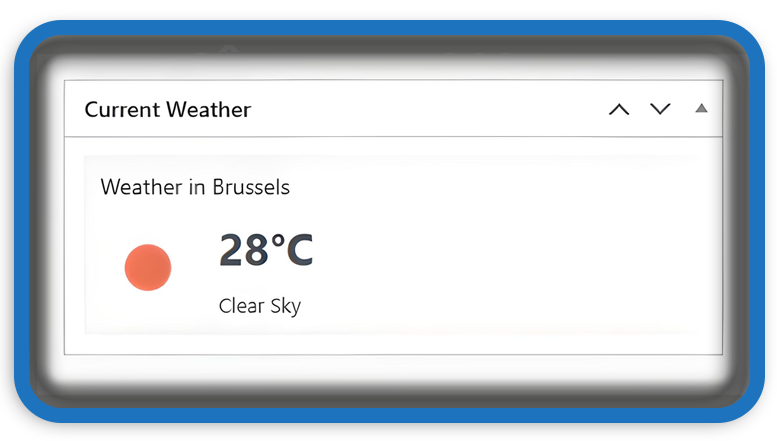
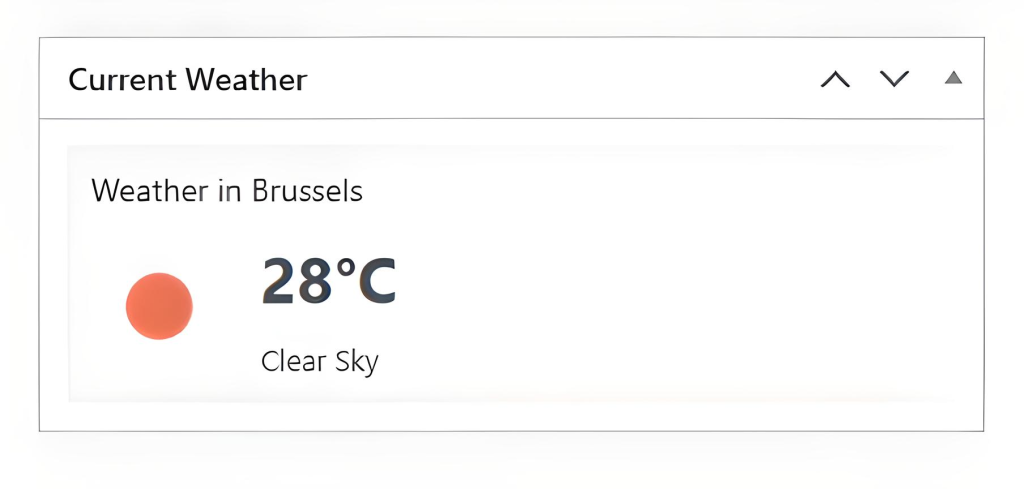
The Weather Dashboard Widget is a custom WordPress plugin that integrates real-time weather data into your admin dashboard. It uses the OpenWeatherMap API to retrieve weather information for a specified city (default: Brussels), displaying:
- Current temperature in Celsius
- Condition (e.g., clear sky, rain)
- Icon
This is especially useful for bloggers, news writers, or travel site admins who want to keep weather conditions front and center during content creation.
🔧 Prerequisites Before Setup
Before installing or coding the plugin, ensure you meet the following requirements:
- WordPress installed and running (version 5.0+ recommended)
- Access to your theme’s or site’s
wp-content/plugins/directory - A free API key from OpenWeatherMap
🔑 Step 1: Get an API Key from OpenWeatherMap
- Go to https://home.openweathermap.org/users/sign_up
- Create a free account.
- Navigate to the API Keys section after verifying your email.
- Copy your generated API key (a string of characters).
Keep this key safe you’ll use it in the plugin code.
🧠 Step 2: Create the Plugin File
Now let’s build the plugin itself:
- Open your WordPress installation directory via FTP or cPanel.
- Navigate to:
wp-content/plugins/ - Create a new folder:
weather-dashboard-widget - Inside that folder, create a file:
weather-dashboard-widget.php - Paste the following PHP code into that file:
<?php
/**
 * Plugin Name: Weather Dashboard Widget
 * Description: Displays current weather information on the WordPress dashboard.
 * Version: 1.0
 * Author: Your Name
 */

function display_weather_widget() {
    $api_key = 'YOUR_API_KEY_HERE'; // Replace with your actual API key
    $city = 'Brussels';

    $api_url = "https://api.openweathermap.org/data/2.5/weather?q=" . urlencode($city) . "&appid=" . $api_key . "&units=metric&lang=en";
    $response = wp_remote_get($api_url);

    if (!is_wp_error($response)) {
        $body = wp_remote_retrieve_body($response);
        $weather_data = json_decode($body);

        if ($weather_data && isset($weather_data->main)) {
            $temp = round($weather_data->main->temp);
            $description = $weather_data->weather[0]->description;
            $icon_code = $weather_data->weather[0]->icon;
            $icon_url = "https://openweathermap.org/img/wn/{$icon_code}@2x.png";

            echo '<div class="weather-widget" style="padding: 10px; background: #f5f5f5; border-radius: 4px;">';
            echo '<h3 style="margin-top: 0;">Weather in ' . esc_html($city) . '</h3>';
            echo '<div style="display: flex; align-items: center;">';
            echo '<img src="' . esc_url($icon_url) . '" alt="' . esc_attr($description) . '" style="width: 60px; height: 60px; margin-right: 15px;">';
            echo '<div>';
            echo '<p style="font-size: 28px; margin: 0 0 5px 0; font-weight: bold;">' . esc_html($temp) . '°C</p>';
            echo '<p style="margin: 0; text-transform: capitalize; color: #555;">' . esc_html($description) . '</p>';
            echo '</div>';
            echo '</div>';
            echo '</div>';
        } else {
            echo '<p>Could not load weather data. Please check your API key and city name.</p>';
        }
    } else {
        echo '<p>Error connecting to the weather service: ' . esc_html($response->get_error_message()) . '</p>';
    }
}

function add_weather_dashboard_widget() {
    wp_add_dashboard_widget(
        'weather_dashboard_widget',
        'Current Weather',
        'display_weather_widget'
    );
}

add_action('wp_dashboard_setup', 'add_weather_dashboard_widget');
⚠️ Don’t forget to replace
YOUR_API_KEY_HEREwith your actual API key.
🧪 Step 3: Activate the Plugin
- Go to your WordPress admin panel.
- Navigate to Plugins > Installed Plugins
- You should see “Weather Dashboard Widget” in the list.
- Click Activate
Once activated, you’ll see the new widget on the Dashboard page (typically at the top or bottom depending on existing widgets).
🛠️ Optional: Customize the Plugin
✅ Change the City
Edit this line:
$city = 'Brussels';
Replace 'Brussels' with any city of your choice, like 'London', 'New York', or 'Tokyo'.
✅ Change the Units
&units=metric→ Celsius&units=imperial→ Fahrenheit
⚙️ How It Works (Behind the Scenes)
Here’s a quick technical overview:
wp_remote_getfetches the weather JSON data from OpenWeatherMap.json_decodeparses it.- It extracts:
main.temp: Temperatureweather[0].description: Condition textweather[0].icon: Weather icon
- Output is styled using inline HTML + basic CSS.
🛡️ Troubleshooting Tips
| Issue | Possible Cause | Fix |
|---|---|---|
| “Could not load weather data” | Invalid API key or typo in city name | Double-check your key and spelling |
| No widget shown | Plugin not activated or PHP errors | Ensure no syntax issues, and plugin is activated |
| Icon not loading | OpenWeatherMap down or blocked | Check direct access to the icon URL |
🖼️ Styling the Widget
You can customize the appearance further using CSS:
Add to your admin customizer or enqueue styles in a plugin:
.weather-widget {
  background: #e0f7fa;
  border-left: 4px solid #039be5;
}
🔔For more tutorials like this, consider subscribing to our blog.
📩 Do you have questions or suggestions? Leave a comment or contact us!
🏷️ Tags: weather widget, WordPress plugin, openweathermap API, custom plugin, WP dashboard, WordPress tutorial, add dashboard widget, real-time weather, WordPress coding, admin panel tools
📢 Hashtags: #WordPressPlugin, #WeatherWidget, #WPAdmin, #OpenWeatherMap, #CustomPlugin, #WPDevelopment, #WordPressTips, #CodingTutorial, #WebDevelopment, #WPBeginner
🧭 Final Thoughts
Creating a custom weather dashboard widget is a great way to enhance your WordPress backend experience. Whether you’re a developer looking to personalize admin tools or a content creator who loves real-time data, this widget delivers valuable utility with minimal code.
Use it as-is, or customize further for multilingual support, user geolocation, or extended forecast features. Happy coding!
Only logged-in users can submit reports.
Discover more from HelpZone
Subscribe to get the latest posts sent to your email.