⏲️ Estimated reading time: 3 min
🧩 How To Export in Adobe Photoshop and Save Images as WebP Files
📝 Learn how to export images as WebP in Adobe Photoshop to boost your website speed and performance. This guide walks you through each step for exporting lightweight, high-quality WebP images perfect for modern web usage.
Why Use WebP Files Format?
WebP is a modern image format developed by Google that provides superior lossless and lossy compression for images on the web. It helps reduce file size while maintaining excellent image quality, resulting in faster loading times and better SEO performance. If you’re managing a website, especially with WordPress, using WebP images can significantly enhance user experience and Google PageSpeed scores.
Requirements to Export WebP in Photoshop
Before you can export in WebP format using Adobe Photoshop, ensure the following:
- You’re using Photoshop 23.2 or later (WebP support is built-in).
- For earlier versions, you’ll need the WebP plugin from Google or install the Adobe WebP plugin manually.
- Optional: Use Creative Cloud updates for optimal compatibility.
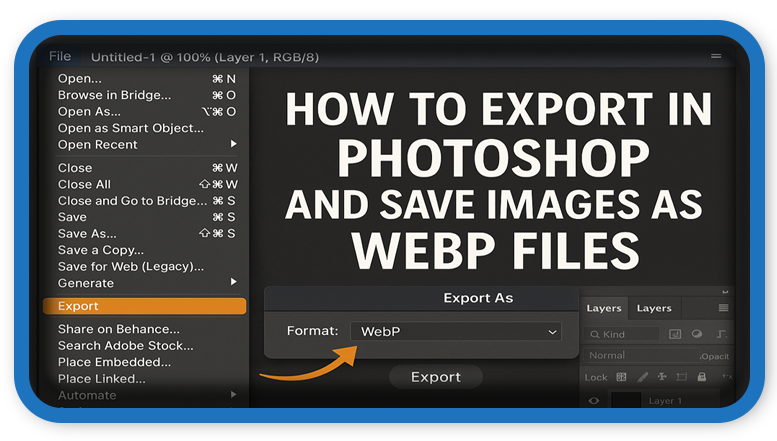
Step-by-Step: Export WebP Files in Adobe Photoshop
🔧 Method 1: Using Native WebP Export (Photoshop 23.2+)
- Open your image in Photoshop.
- Go to File > Save a Copy.
- In the format dropdown, choose WebP.
- Click Save, and a dialog box will appear.
- Adjust the quality (recommended: 75-85 for balance).
- Press OK to export.
💡 Tip: Use “Save a Copy” instead of “Save As” if you don’t see WebP listed under formats.
🔌 Method 2: Using WebP Files Plugin (For Older Photoshop Versions)
- Download the official WebP plugin for Photoshop from the Google WebP GitHub page.
- Extract the downloaded
.pluginor.8bifile. - Copy it to:
- macOS:
/Applications/Adobe Photoshop/Plug-ins/ - Windows:
C:\Program Files\Adobe\Adobe Photoshop\Plug-ins\
- macOS:
- Restart Photoshop.
- Open your image and go to File > Save As → Choose WebP.
Export Tips for Web Optimization
- Resize large images before export. Aim for dimensions that match your display needs.
- Use “Export As” with presets to control file size and quality.
- Keep quality between 70–85 to strike a good balance for web performance.
- Use lossless WebP only if transparency is crucial, otherwise stick to lossy WebP for better compression.
Bonus: Automate WebP Files Export via Scripts
For batch processing:
- Use Photoshop Actions to record an export workflow.
- Combine it with Image Processor Pro or Droplets to export multiple images to WebP in one go.
- Consider using external tools like XnConvert, Squoosh, or ImageMagick for bulk conversion outside Photoshop.
Verifying WebP Compatibility in WordPress
Once your WebP images are ready:
- Use the tag or lazy loading plugins to serve WebP with JPEG fallback.
- Enable WebP support in WordPress via plugins like WebP Express, ShortPixel, or EWWW Image Optimizer.
- Ensure your theme supports WebP and doesn’t strip new image formats on upload.

Exporting WebP files in Adobe Photoshop is now a seamless process, especially with the latest versions. Whether you’re managing a photography portfolio, a blog, or an eCommerce site, adopting the WebP format ensures faster load times, reduced bandwidth usage, and improved overall site performance.
📩 Do you have questions or suggestions? Leave a comment or contact us!
🏷️ Tags: adobe photoshop, webp images, export webp, photoshop tutorial, image optimization, save as webp, wordpress performance, web image format, modern image compression, how to export in photoshop
Only logged-in users can submit reports.
Discover more from HelpZone
Subscribe to get the latest posts sent to your email.