⏲️ Estimated reading time: 5 min
cPanel Directory Privacy: How to Secure Your Website Folders
Directory Privacy in cPanel helps you protect sensitive areas of your website with a password. Learn how to set it up easily and why it’s essential for your site’s security.
cPanel Directory Privacy
When managing a website, keeping sensitive files and folders secure is crucial. One powerful tool available to website owners using cPanel is Directory Privacy. It allows you to password-protect directories, preventing unauthorized access to critical parts of your site. In this article, we’ll dive deep into how Directory Privacy works, how to set it up, and why it’s a must-have for your website security strategy.
What is Directory Privacy in cPanel?
Directory Privacy (formerly known as “Password Protect Directories”) is a feature in cPanel that allows you to restrict access to specific folders on your hosting account. When enabled, anyone trying to access that directory via a web browser will be prompted to enter a username and password.
This is especially useful for:
- Admin areas
- Development sites
- Private downloads
- Confidential company files
Why Should You Use Directory Privacy?
Using Directory Privacy enhances your website’s security in several ways:
- Protect sensitive information: Limit access to admin folders or confidential files.
- Secure development sites: Block visitors from unfinished parts of your website.
- Limit download access: Share files with specific users securely.
- Comply with regulations: Protect customer and business data as required by laws like GDPR.
By applying a simple password layer, you can avoid common hacks and unauthorized browsing.
How to Set Up Directory Privacy in cPanel
Setting up DP is a straightforward process. Here’s a step-by-step guide:
Step 1: Log in to cPanel
Start by logging into your cPanel account provided by your web host.
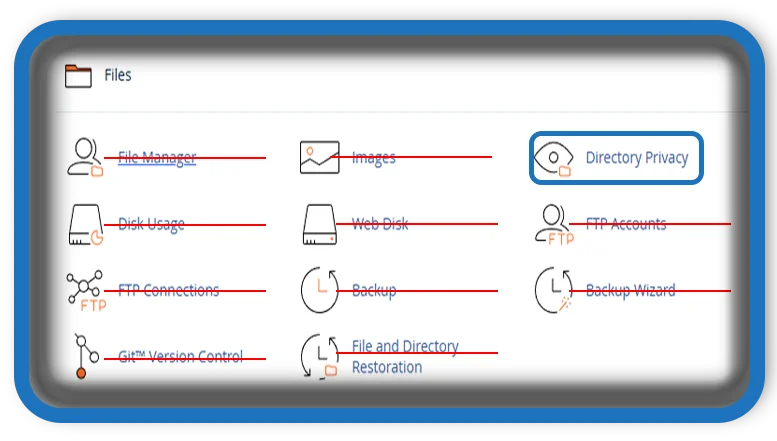
Step 2: Access Directory Privacy
Once inside cPanel:
- Look for the DP icon, usually located under the Files section.
- Click to open the tool.
Step 3: Choose the Directory
You’ll see a list of folders on your hosting account.
- Navigate through your directory tree and click the folder you want to protect.
Step 4: Enable Password Protection
Once you select a directory:
- Check the box labeled Password protect this directory.
- Give the protected area a name (this name appears when users are prompted for login credentials).
Step 5: Create a User
Now create a user who will have access:
- Enter a username.
- Set a strong password (use cPanel’s password generator for better security).
- Click Save or Create User.
That’s it! Now, when someone tries to access that folder via a browser, they’ll see a login prompt.
Tips for Strong Directory Privacy Protection
Here are a few tips to make your DP even stronger:
- Use Strong Passwords: Always create complex passwords that include letters, numbers, and symbols.
- Limit Users: Only create accounts for those who absolutely need access.
- Change Passwords Regularly: Update passwords periodically to keep things secure.
- Monitor Access: Keep an eye on access logs to detect any unusual login attempts.
- Combine with SSL: Make sure your site uses HTTPS to encrypt the username and password when users log in.
Common Problems and How to Solve Them
While DP is a powerful tool, you might encounter a few common issues:
- Authorization Prompt Not Appearing: Ensure your
.htaccessfile and directory permissions are correctly set. - Wrong Username or Password Errors: Double-check the credentials and ensure the user was properly added.
- Browser Caching Login: Some browsers cache login details; clearing cache or using private browsing can help during testing.
If you continue to face problems, contacting your hosting provider’s support team is always a good step.
Directory Privacy vs. Other Protection Methods
You might wonder if you still need Directory Privacy when you have other security tools like:
- WordPress plugins
- Firewalls
- Hosting account passwords
While these are critical, Directory Privacy provides an additional layer right at the server level. Even if someone bypasses your CMS login page, they would still need to pass the directory password gate.
Think of it as locking your front door and putting a safe inside your house.
Best Practices for Using cPanel Directory Privacy
Follow these best practices to maximize your website’s security:
- Always enable DP for admin, backup, or confidential folders.
- Use unique usernames not easily guessable (avoid “admin” or “test”).
- Regularly audit protected directories and remove unused user accounts.
- Complement DP with two-factor authentication (2FA) for even better protection.
Conclusion
Directory Privacy in cPanel is a simple yet powerful way to add password protection to your important website folders. Whether you run a small blog or a large e-commerce site, securing critical directories should be part of your overall website security plan.
By taking just a few minutes to set it up, you add another solid defense layer, giving you peace of mind knowing your data is protected.
📩 Do you have questions or suggestions? Leave a comment or contact us!
🏷️ Tags: cpanel, directory privacy, website security, cpanel tutorial, protect folders, password protect directories, hosting security, web hosting, cpanel guide, wordpress security
Only logged-in users can submit reports.
Discover more from HelpZone
Subscribe to get the latest posts sent to your email.