⏲️ Estimated reading time: 4 min
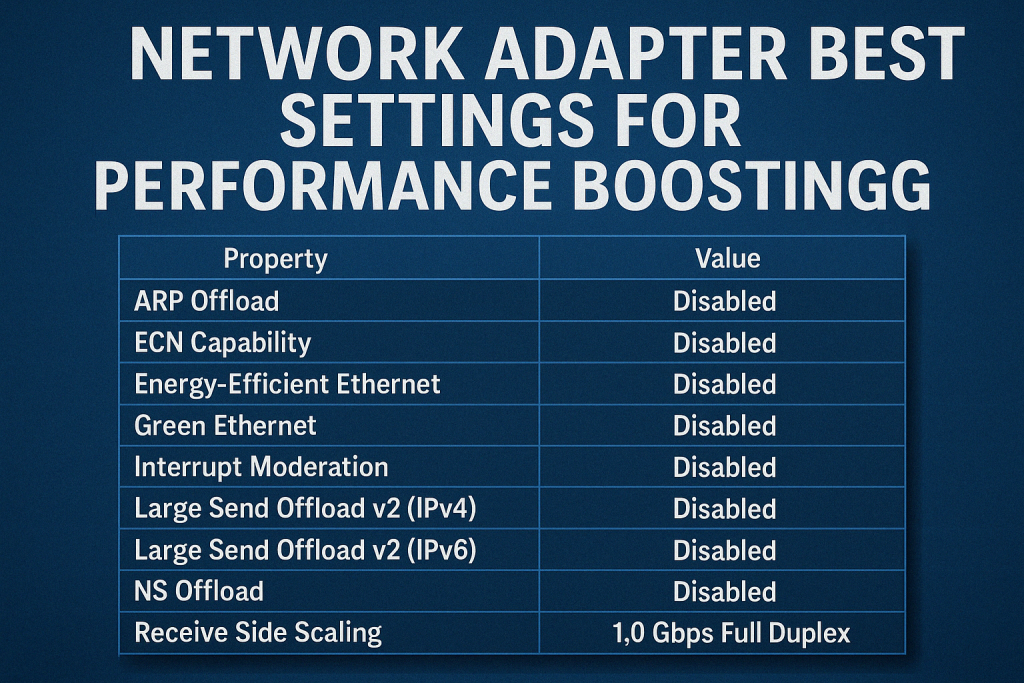
Network Adapter Best Settings for Performance Boosting. Optimizing your network adapter settings can dramatically improve your internet speed and system performance. In this guide, we break down the best tweaks and advanced options to maximize network efficiency on Windows PCs.
Why Network Adapter Settings Matter
In today’s digital world, whether you’re gaming, streaming, or working remotely, a fast and stable internet connection is crucial. While most users rely on their default network settings, the truth is that you can significantly boost your internet performance by fine-tuning your network adapter settings. These configurations, hidden deep in your system, directly impact how your computer communicates with the internet and other network devices.
This guide will show you how to access, understand, and optimize these settings for maximum performance on Windows systems.
Step 1: Accessing Your Network Adapter Settings
To start tweaking, you need to get into the device manager and locate your network adapter:
- Press
Windows Key + Xand choose Device Manager. - Expand the Network adapters section.
- Right-click on your active adapter (usually Intel or Realtek) and select Properties.
- Click the Advanced tab this is where all the magic happens.
Here you’ll see a list of properties that you can adjust to improve speed, reduce latency, and even lower CPU usage.
Step 2: Best Network Adapter Settings to Change
Below are the most effective settings you can adjust. Keep in mind that the exact options available depend on your hardware and driver.
1. Speed & Duplex
- Best setting: 1.0 Gbps Full Duplex or Auto Negotiation (if using Gigabit Ethernet)
- Why: Manually setting to the highest stable value ensures consistent bandwidth. Avoid “Auto” if your connection is unstable.
2. Interrupt Moderation
- Best setting: Disabled
- Why: While enabled, this reduces CPU usage, but it adds latency. Disabling it improves responsiveness, especially for gaming.
3. Receive Side Scaling (RSS)
- Best setting: Enabled
- Why: Allows your PC to use multiple CPU cores to process network traffic. Boosts performance on multi-core systems.
4. Large Send Offload (IPv4/IPv6)
- Best setting: Disabled
- Why: Offloading can help with CPU usage but may cause issues with some routers. Disabling often reduces lag in games.
5. TCP Checksum Offload
- Best setting: Disabled
- Why: Lets the OS handle error checking rather than the adapter. Can reduce overhead and improve compatibility.
6. Jumbo Frame
- Best setting: Disabled unless using a high-performance local network (like for NAS)
- Why: Increases packet size, which is great for LAN transfers but can cause issues on the public internet.
7. Green Ethernet / Energy Efficient Ethernet
- Best setting: Disabled
- Why: Saves power at the cost of speed and latency. Turn this off for better stability and responsiveness.

Step 3: Additional System Tweaks
Your adapter settings are only part of the performance puzzle. Here are a few extra tweaks:
1. Disable Power Saving for the Adapter
Go to Control Panel > Power Options > Change Plan Settings > Change Advanced Power Settings, then:
- Navigate to Wireless Adapter Settings and set to Maximum Performance
- Go to PCI Express > Link State Power Management and set it to Off
2. Use a Static IP (Optional)
Dynamic IPs are fine for most users, but a static IP can improve connection reliability for streaming, remote desktop, or port forwarding setups.
3. Update Network Adapter Drivers
Old drivers can cause performance bottlenecks. Always get the latest drivers from your manufacturer’s official website.
Step 4: Use Command Line for Deeper Optimization
Advanced users can use Windows PowerShell or Command Prompt to modify TCP/IP stack settings:
netsh int tcp set global autotuninglevel=highlyrestricted
netsh int tcp set global rss=enabled
netsh int tcp set global chimney=enabled
netsh int tcp set global dca=enabled
These commands optimize how Windows handles network traffic and are generally safe for most modern PCs.
Step 5: Test Your Results
After applying all changes:
- Reboot your PC
- Run speed tests (like speedtest.net)
- Use latency tests (like
pingor PingPlotter) to measure improvements
If you notice issues, revert one change at a time to identify the culprit.
Conclusion: Small Tweaks, Big Gains
Optimizing your network adapter settings is one of the easiest and most overlooked ways to boost your internet speed, reduce latency, and improve your overall PC performance. Whether you’re a competitive gamer or a remote worker, these adjustments can make a noticeable difference.
Always test your changes, and don’t be afraid to experiment with settings specific to your hardware. With a few tweaks, you’ll get the most out of your connection and keep your system running smoothly.
🏷️ Tags: network adapter, windows settings, internet speed, performance boost, gaming optimization, reduce latency, wifi settings, ethernet tweak, windows tips, adapter configuration
Only logged-in users can submit reports.
Discover more from HelpZone
Subscribe to get the latest posts sent to your email.

